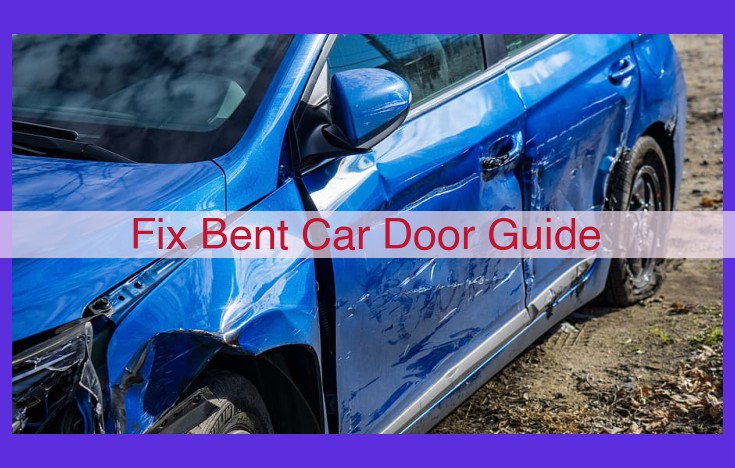
A bent car door guide compromises door function and can lead to alignment issues. This guide provides comprehensive guidance on door alignment, hinge adjustment, door panel removal, door latch repair, paintless dent repair, body filler application, and sanding and refinishing. By understanding these techniques, readers can effectively address bent car door guide problems, restoring proper door operation and appearance.
Bent Car Door Guide: A Comprehensive Guide to Diagnosis and Repair
Imagine this: you’re driving down the highway, enjoying the scenery, when suddenly, your car’s door malfunctions. It refuses to close properly, leaving a gaping void that fills the vehicle with the roar of wind and rain. Frustration sets in as you realize that this minor inconvenience has become a major headache. Bent car door guides are often the culprit behind such mishaps. They play a crucial role in keeping your doors aligned and operating seamlessly, so addressing any problems promptly is essential for a safe and comfortable driving experience.
What Causes Bent Car Door Guides?
Bent car door guides can result from various factors, including:
- Accidents: Impacts or collisions can cause the guides to bend or break, resulting in misalignment and jamming.
- Wear and Tear: Over time, the guides can become worn due to constant use, leading to their gradual bending and eventual failure.
- Poor Manufacturing: In some cases, faulty manufacturing can result in weak or defective guides that are more prone to bending.
Why Addressing Bent Car Door Guides is Important
Failing to address bent car door guides can have several negative consequences:
- Safety Hazards: Misaligned doors can create gaps that allow air and rain to enter the vehicle, impairing visibility and creating an unsafe driving environment.
- Premature Wear: Bent guides can cause excessive friction, leading to accelerated wear and tear on other door components, such as hinges and latches.
- Aesthetic Damage: Doors that fail to close properly can rattle and squeak, creating an unsightly and unpleasant driving experience.
Don’t let bent car door guides ruin your driving experience. By being aware of their importance, you can diagnose and address these problems promptly, ensuring a safe and comfortable journey every time you get behind the wheel.
Door Alignment: Ensuring Seamless Door Operation
When a car door is misaligned, it can lead to a host of problems, ranging from difficulty opening and closing to excessive wind noise. Proper door alignment is crucial for optimal vehicle performance, ensuring a secure fit, smooth operation, and a comfortable driving experience.
Definition of Door Alignment
Door alignment refers to the precise positioning of the car door in relation to the door frame to ensure a flush fit and proper closure. When aligned correctly, the door should close effortlessly with a consistent gap around the edges.
Techniques for Checking and Adjusting Door Alignment
To check door alignment, simply close the door and inspect the gap between the door and the frame. Uneven gaps or difficulty closing are signs of misalignment. Adjusting door alignment involves loosening the hinges, repositioning the door, and then tightening the hinges back into place.
Additional Related Concepts
Door alignment is closely linked to several other aspects of car maintenance:
- Hinge Adjustment: Worn or damaged hinges can affect door alignment. Proper hinge adjustment is essential for smooth door operation.
- Door Panel Removal: In some cases, it may be necessary to remove the door panel to access the hinges and adjust the door alignment.
- Door Latch Repair: A faulty door latch can prevent the door from closing properly, leading to misalignment. Repairing or replacing the latch is crucial for a secure closure.
By understanding door alignment and these related concepts, you can maintain a well-functioning car door that operates smoothly and safely.
Hinge Adjustment: A Guide to Correct Door Alignment
Hinge adjustment is a crucial aspect of door alignment, ensuring proper door function and a seamless vehicle appearance. Whether you’re a seasoned mechanic or a curious DIY enthusiast, understanding the techniques involved in hinge adjustment will empower you to address bent car door problems with confidence.
Common Hinge Adjustment Methods
Several methods are commonly employed for hinge adjustment, each tailored to specific types of hinges and vehicles. The most prevalent techniques include:
- Vertical Adjustment: This method involves raising or lowering the door by adjusting the bolts on the top and bottom hinges.
- Horizontal Adjustment: Also known as “in-and-out” adjustment, this technique allows you to move the door inward or outward to align it with the body.
- Fore-and-Aft Adjustment: This adjustment method is less common but can be necessary to correct door alignment issues related to door sag or rubbing.
Tools and Materials Required
To perform hinge adjustment, you’ll need a few essential tools and materials:
- Ratchet or Socket Wrench: To loosen and tighten the hinge bolts.
- Wrenches (Open-End or Adjustable): For accessing hard-to-reach bolts.
- Screwdrivers (Phillips and Flathead): For removing interior door panels, if necessary.
- Level: To ensure the door is properly aligned vertically.
- Measuring Tape: To check the horizontal and fore-and-aft alignment.
- Shims or Washers: To create necessary gaps for precise alignment.
Related Concepts
Hinge adjustment is closely related to several other concepts that may be encountered during door alignment troubleshooting:
- Door Alignment: Hinges play a crucial role in maintaining proper door alignment, ensuring the door opens and closes smoothly.
- Door Panel Removal: Removing the door panel may be necessary to access the hinges and make adjustments.
- Paintless Dent Repair: In some cases, hinge adjustment may be combined with paintless dent repair techniques to restore the door’s appearance.
Door Panel Removal: A Comprehensive Guide to Dismantling Your Door
When it comes to auto repair and maintenance, understanding how to remove a door panel is a crucial skill. Whether you’re troubleshooting a door alignment issue, adjusting hinges, or repairing a latch, knowing how to access the interior of your door is essential.
Before embarking on this task, take the time to prepare and familiarize yourself with the necessary precautions. Always consult your vehicle’s service manual for specific instructions and safety guidelines. Use the correct tools and materials to minimize the risk of damaging the panel or its components.
With care and precision, follow these steps to remove your door panel:
- Disconnect the battery: Ensure safety by disconnecting the negative terminal of your vehicle’s battery to prevent any electrical accidents.
- Locate fasteners: Identify all the screws or bolts that hold the panel in place. They may be located around the edges, behind trim pieces, or inside door handles.
- Remove trim pieces: If necessary, carefully remove any trim pieces that obstruct access to the fasteners. Use a trim removal tool or a flat-head screwdriver to gently pry them off.
- Unscrew fasteners: Use a socket wrench, screwdriver, or hex key to unscrew the fasteners you located earlier. Remember to work methodically and keep track of where each fastener goes.
- Pull the panel away: Once all the fasteners are removed, carefully pull the door panel towards you. It may be attached by clips or hooks, so be gentle and avoid causing damage.
- Disconnect electrical connectors: Identify and disconnect any electrical connectors or cables that are attached to the door panel, such as power window switches, speakers, or courtesy lights.
Remember:
- Take your time and proceed with caution: Avoid rushing the process to minimize the risk of breaking or damaging the panel.
- Use the right tools: Having the correct tools for the job will make the process smoother and safer.
- Refer to your vehicle’s service manual: This will provide specific instructions and torque specifications for your particular vehicle.
If you encounter any difficulties or uncertainties, don’t hesitate to consult with a professional mechanic for assistance. Removing a door panel is a manageable task that can empower you to tackle various automotive repair and maintenance projects with confidence.
Door Latch Repair: A Comprehensive Guide
When your car door latch malfunctions, it can be a major inconvenience. Not only is it a pain to deal with a door that won’t open or close properly, but it can also be a safety hazard. That’s why it’s important to know how to diagnose and repair door latch problems.
There are several different types of door latch malfunctions, each with its own unique set of symptoms. Some of the most common types of door latch problems include:
- Latch misalignment: This can occur when the latch is not properly aligned with the striker plate.
- Broken latch: This can be caused by a number of things, including excessive force, wear and tear, or an accident.
- Faulty actuator: The actuator is the electrical component that controls the latch. A faulty actuator can cause the latch to not engage or disengage properly.
If you’re experiencing any of these symptoms, it’s important to diagnose the problem and make repairs as soon as possible. To diagnose a door latch problem, you’ll need to:
- Inspect the latch and striker plate: Look for any signs of misalignment or damage.
- Test the actuator: Use a multimeter to test the actuator for continuity.
- Check the door panel: Remove the door panel to inspect the latch and actuator more closely.
Once you’ve diagnosed the problem, you can begin repairs. Here are some tips for repairing door latch problems:
- **If the latch is misaligned, you can adjust it by loosening the bolts that hold it in place and then moving it until it is properly aligned with the striker plate.
- If the latch is broken, you will need to replace it.
- If the actuator is faulty, you will need to replace it.
In some cases, you may be able to repair a door latch problem yourself. However, if you’re not comfortable working on your car, it’s best to take it to a mechanic.
Paintless Dent Repair: A Revolutionary Approach for Restoring Vehicle Aesthetics
If you’ve ever been frustrated by the unsightly dents that mar the flawless surface of your car, you’ll appreciate the transformative power of paintless dent repair (PDR). This innovative technique has revolutionized the way we address vehicle body damage, offering a remarkable alternative to traditional repair methods.
PDR’s primary advantage lies in preserving the original factory finish of your vehicle. Unlike traditional repairs that involve applying body filler, sanding, and repainting, PDR allows skilled technicians to restore the original shape of the dent without damaging the surrounding paint. This means no visible evidence of repair remains, ensuring the integrity of your car’s pristine appearance.
The tools and techniques employed in PDR are equally innovative. Technicians use specialized dent removal tools to carefully massage the damaged area from behind the panel, gently coaxing it back into its original shape. This meticulous process requires great skill and precision, as each dent presents its own unique challenges.
PDR’s versatility extends to a wide range of dent types. From minor dings to substantial creases, dents caused by hail damage, collisions, or improper parking can all be effectively addressed using this technique. PDR is also ideal for restoring dents on aluminum panels, which are notoriously difficult to repair using traditional methods.
In addition to its cosmetic benefits, PDR offers practical advantages as well. It is significantly faster than traditional repairs, often taking as little as a few hours to complete. This means you can get your car back on the road sooner, without sacrificing quality. Furthermore, PDR is more cost-effective than traditional repairs, as it eliminates the need for paint and bodywork.
If you’re seeking a solution for vehicle body dents that preserves the original finish, enhances the resale value, and saves you time and money, paintless dent repair is the answer. With its advanced techniques and skilled technicians, PDR is the future of automotive dent repair, and it’s here to restore the beauty and integrity of your cherished vehicle.
Body Filler: A Lifeline for Bent Car Doors
Is your car door out of shape, its once-smooth surface now marred by a bent or dented appearance? Don’t despair just yet. Body filler, a versatile automotive repair solution, can step in as your savior.
Body filler, often referred to as “Bondo” after a popular brand name, is a modeling compound used to fill gaps, smooth irregularities, and restore the original contours of car body panels. It’s a cost-effective and time-saving alternative to more invasive repair methods like welding or panel replacement.
Types of Body Fillers
There’s a wide range of body fillers available, each with its own set of properties and applications. The most common types include:
- Polyester-based body filler: Strong, durable, and versatile, suitable for both small and large repairs.
- Epoxy-based body filler: High-strength adhesive properties, ideal for structural repairs and bonding different materials.
- Acrylic-based body filler: Provides a smooth, paintable surface, perfect for shallow scratches and dents.
Applications and Benefits of Body Fillers
Body fillers play a crucial role in repairing bent or dented car doors:
- Filling gaps: They fill in gaps between panels, ensuring a smooth transition and preventing water or debris from entering.
- Smoothing irregularities: They smooth out dents, scratches, and other imperfections, restoring the door’s original shape.
- Repairing structural damage: With their structural strength, body fillers can repair minor structural damage, such as cracks or holes.
Techniques for Applying Body Filler
Applying body filler is a multi-step process that requires precision and attention to detail:
- Preparation: Clean and prepare the surface to be repaired, ensuring it’s free from rust, dirt, or debris.
- Mixing: Combine the body filler and hardener according to the manufacturer’s instructions.
- Application: Apply the mixed body filler using a flexible spatula or spreader, working it into the repair area.
- Shaping: Using sandpaper or a sanding block, shape the body filler to blend seamlessly with the surrounding surface.
- Sanding and Refinishing: Once the body filler is dry, sand it smooth and apply paint or other refinishing materials to match the original exterior.
Body filler is an indispensable tool in the arsenal of automotive repair. Its ability to fill gaps, smooth irregularities, and repair structural damage makes it the perfect solution for restoring bent or dented car doors to their former glory. By understanding the types, applications, and techniques involved, you can effectively restore your car’s appearance and structural integrity.
Sanding and Refinishing: The Art of a Pristine Finish
Sanding and refinishing are crucial steps in restoring a damaged car’s surface to its former glory. This process requires precision, patience, and a keen eye for detail.
Techniques and Materials:
Sanding involves removing imperfections using sandpaper of varying grits. Start with a coarse grit to level the surface and gradually move to finer grits to smooth it out. Refinishing involves applying a new layer of paint or clear coat to restore the original finish. Use high-quality materials and follow manufacturer’s instructions for optimal results.
Safety Precautions:
Sanding and refinishing generate dust and fumes. Always wear protective gear, including a mask, gloves, and eye protection. Ensure adequate ventilation in the workspace to avoid respiratory issues.
Quality Control:
Achieving a professional finish requires meticulous attention to detail. Inspect the surface thoroughly at each stage to identify any flaws or imperfections. Use a flashlight to highlight uneven areas and ensure a smooth transition between sanded and unsanded surfaces.
Related Concepts:
Sanding and refinishing are closely tied to paintless dent repair and body filler. Paintless dent repair addresses minor dents without affecting the original paint finish, while body filler fills in larger dents and imperfections before sanding and refinishing.
By following these guidelines and employing a meticulous approach, you can restore your car’s surface to its pristine condition, enhancing its appearance and value.