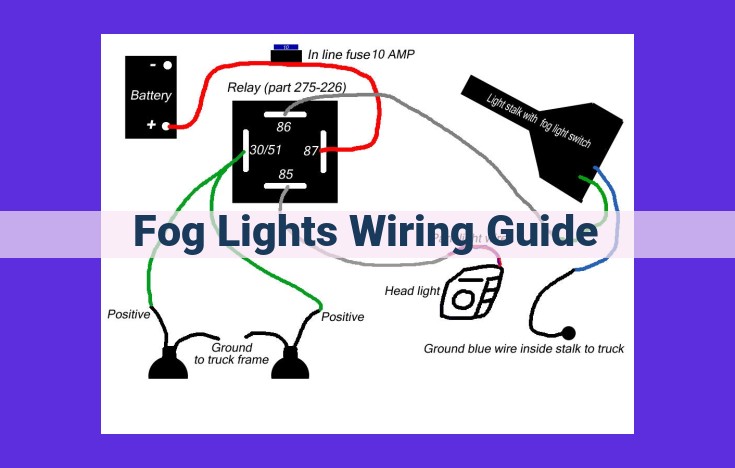
This comprehensive fog light wiring guide covers selecting the right kit, locating the wiring harness, identifying and connecting wires, grounding the lights, testing functionality, troubleshooting issues, understanding control switches, installing additional lights, and upgrading to HID/LED bulbs. It provides detailed instructions and diagrams to ensure a successful fog light installation, enhancing vehicle safety and visibility in poor weather conditions.
The Ultimate Guide to Choosing the Right Fog Light Kit
Fog lights are an indispensable asset for enhancing visibility in adverse weather conditions. Whether you’re navigating through a dense fog, rain, or snow, these powerful lights illuminate the road ahead, ensuring your safety and driving peace of mind. To get the most out of your fog light upgrade, selecting the right kit is crucial. Here’s a comprehensive guide to help you make an informed decision.
Types of Fog Lights
Fog lights come in various types, each with its own unique advantages and disadvantages.
- Halogen: Traditional halogen fog lights offer excellent output at a reasonable cost. They’re reliable and widely available.
- LED: LED fog lights are energy-efficient, long-lasting, and produce bright, crisp light. However, they tend to be more expensive than halogen versions.
- HID: HID (High-Intensity Discharge) fog lights emit an ultra-bright light, surpassing both halogen and LED lights. However, they require additional components, such as ballasts and igniters, and can be more complex to install.
Wattage, Output, and Beam Patterns
The wattage of your fog lights determines their brightness. Higher wattage lights produce more light, but they also consume more energy. Choose a wattage that balances brightness with energy consumption.
The light output, measured in lumens, indicates the overall brightness of the fog lights. A higher lumen output provides better visibility.
The beam pattern refers to the shape of the light distribution. Fog lights typically have wide-angle beam patterns to illuminate a larger area close to the road.
Mounting Options
Fog lights can be mounted in various locations on your vehicle.
- Bumper mount: The most common mounting option, these lights are attached to the front bumper.
- Grille mount: Grille-mounted fog lights provide a more discreet look and better protection.
- Bracket mount: Bracket mounts offer flexibility, allowing you to mount the fog lights in specific locations as needed.
Locating the Wiring Harness: Unlocking the Hidden Circuits
Before you begin wiring your fog lights, it’s critical to locate the vehicle’s wiring harness. This vital component provides the electrical conduits through which power flows to your lights. To successfully identify the harness, you’ll need to consult your vehicle’s wiring diagrams. These diagrams, typically found in your owner’s manual or online, contain a wealth of information about the location and function of every wire in your car.
Once you’ve obtained the wiring diagrams, carefully examine them to locate the fog light circuit. This circuit typically includes a relay, which acts as a switch that controls power flow to the fog lights, and a fuse, which protects the circuit from overcurrent damage.
The next step is to identify the physical location of the fuse panel and relay box. These components are usually hidden beneath the dashboard or under the hood. Refer to your wiring diagrams to find their exact location. Once you’ve located the fuse panel, identify the fuse that corresponds to the fog light circuit. If the fuse is blown, you’ll need to replace it with a new one of the same amperage rating.
Finally, locate the relay box. The fog light relay will typically be identified by a label or a symbol on the box. Once you’ve found the relay, you can remove it to inspect its contacts and terminals. If the contacts are corroded or damaged, you may need to replace the relay. By following these steps, you’ll be well on your way to successfully locating the wiring harness and preparing your vehicle for the installation of your fog lights.
Identifying the Wires
- Describe wire colors and patterns
- Discuss wire gauge and polarity
Identifying the Electrical Wiring for Fog Lights
Identifying the correct wires is crucial for a successful fog light installation. Vehicle wiring can be complex, so it’s essential to approach this task cautiously.
- Deciphering Wire Colors and Patterns:
Each wire in the vehicle’s electrical system serves a specific purpose. Fog light kits may come with color-coded wires that correspond to their intended function (e.g., red for power, black for ground, blue for switched power). Familiarize yourself with these color codes before proceeding.
- Understanding Wire Gauge and Polarity:
Wire gauge refers to the thickness of the wire. Thicker wires (lower gauge) can handle more electrical current. Ensure that the wires you use are of sufficient gauge for the fog lights you’re installing. Polarity indicates the direction of current flow. Connect the wires correctly to avoid electrical damage.
Additional Tips for Wire Identification:
- Consult the vehicle’s wiring diagram for specific information about wire colors and functions.
- Use a multimeter to determine the polarity of wires if they are not color-coded.
- Solder or crimp the connections securely to ensure a reliable electrical connection.
- Use heat shrink tubing to insulate and protect the connections from moisture and corrosion.
Connecting the Wires: A Step-by-Step Guide
In this crucial step of fog light installation, we delve into the art of connecting the electrical wires. Whether you choose to use crimping connectors or soldering, it’s essential to ensure a secure and reliable connection to prevent any potential electrical hazards.
Crimping Connectors for Efficient Wiring
Crimping connectors, designed to firmly grip and connect wires, are a popular choice for DIY enthusiasts. They’re easy to use with a simple crimping tool and come in various sizes to accommodate different wire gauges. Once crimped, these connectors provide a strong and reliable connection that can withstand the rigors of automotive use.
Soldering: A Professional Touch
If you prefer a more permanent and robust connection, soldering is the way to go. This technique involves melting solder onto the wires to create a solid, long-lasting bond. Soldering requires a bit more skill and specialized equipment, but it offers the advantage of creating a weatherproof connection that’s less prone to corrosion and vibration.
Heat Shrink Tubing: Protecting Your Connections
Regardless of your preferred connection method, heat shrink tubing is an essential finishing touch to ensure proper insulation and protection from the elements. This flexible material shrinks when heated, forming a tight seal around the connection to prevent moisture and dirt from entering. It also provides strain relief to prevent the wires from becoming loose over time.
By following these steps carefully and using high-quality materials, you can achieve a secure and reliable electrical connection for your fog lights that will enhance your vehicle’s visibility and safety on foggy roads.
Grounding the Fog Lights: A Crucial Step for Electrical Safety
Introduction:
Grounding is an essential aspect of any electrical system, including fog lights, to ensure proper functionality and prevent electrical hazards. In this section, we’ll delve into the importance of grounding and provide a step-by-step guide to selecting the right ground wire and identifying the optimal grounding point for your fog light installation.
Choosing the Ground Wire:
Selecting the appropriate ground wire is crucial for establishing a reliable connection between the fog lights and the vehicle’s chassis. Preferably, select a solid copper wire with a minimum gauge of 14 AWG or thicker. This size ensures adequate current flow and minimizes voltage drop. The wire should also be corrosion-resistant and insulated to withstand the harsh conditions in the engine compartment.
Identifying the Grounding Point:
The grounding point is where the ground wire is connected to the vehicle’s chassis. Ideally, the grounding point should be a bare metal surface that is free of paint, rust, or dirt. This ensures a good electrical connection and prevents interference from other electrical components. Locate a suitable ground point on the chassis or engine block, typically identified by a symbol or a green bolt.
Connecting the Ground Wire:
Once the ground wire and grounding point are selected, proceed with the connection. Strip the insulation from the end of the ground wire and secure it to the grounding point using a bolt or a ring terminal. Tighten the bolt securely to ensure a solid connection. It is recommended to apply a layer of anti-corrosion spray to the connection point for added protection against moisture and oxidation.
Conclusion:
Grounding the fog lights properly is vital for their reliable operation and safety. By selecting the right ground wire and identifying an appropriate grounding point, you can establish a secure electrical connection, minimize electrical hazards, and ensure that your fog lights illuminate the road safely and effectively.
Testing the Functionality of Your Fog Lights
Once the wiring is complete, it’s crucial to ensure your fog lights are functioning correctly. To do this, you’ll need a multimeter or a test light. Here’s how to test your fog lights:
Using a Multimeter
With a multimeter, set it to the voltage mode. Touch the positive probe to the positive terminal of the battery and the negative probe to the ground wire terminal of the fog lights. If the multimeter reads 12 volts or close to it, the circuit is complete, and power is flowing to the fog lights.
Next, set the multimeter to the continuity mode. Touch one probe to the positive terminal of the battery and the other probe to the positive wire of the fog lights. The multimeter should beep or display a low resistance reading, indicating continuity in the wire. Repeat this step for the ground wire, touching one probe to the negative battery terminal and the other to the ground wire of the fog lights.
Using a Test Light
If you don’t have a multimeter, you can use a test light. Connect the test light’s clip to the negative battery terminal. Then, touch the probe of the test light to the positive wire of the fog lights. If the test light illuminates, the circuit is complete, and power is reaching the fog lights. Repeat this step for the ground wire, touching the probe of the test light to the ground wire of the fog lights. If the test light illuminates again, the ground connection is also complete.
By following these steps, you can thoroughly test the functionality of your fog lights, ensuring they’ll illuminate the road safely when needed.
Troubleshooting Common Problems
- Discuss common wiring faults, blown fuses, and switch malfunctions
Troubleshooting Common Fog Light Problems
Fog lights enhance visibility in poor weather conditions, but they can also encounter issues like any electrical component. Here are some common problems you might face and how to address them:
Wiring Faults
- Check for loose connections or damaged wires along the wiring harness.
- Inspect the terminals and solder joints for any corrosion or breaks.
- Use a multimeter to test for continuity and ensure proper grounding.
Blown Fuses
- Locate the fuse panel and identify the fuse associated with the fog lights.
- Replace blown fuses with new ones of the same amperage.
- Check if the new fuse also blows, indicating a potential electrical short.
Switch Malfunctions
- Test the switch using a multimeter. If there’s no continuity, the switch needs to be replaced.
- Check for loose connections or debris in the switch assembly.
- Ensure the switch is properly connected to the wiring harness.
Additional Troubleshooting Tips
- Start with the basics: Check for loose or damaged bulbs, wires, and connectors.
- Consult vehicle wiring diagrams: These can provide valuable information about wire colors and connections.
- Use a test light or multimeter: These tools can help identify faulty electrical components and wiring faults.
- Seek professional assistance: If you’re unable to resolve the problem on your own, consider reaching out to a qualified mechanic or electrician.
Understanding Fog Light Control Switches
Fog lights are essential for enhancing visibility and safety in adverse weather conditions. The control switch plays a crucial role in operating your fog lights. Let’s delve into the different switch types and their wiring schematics.
Switch Types
There are three main types of fog light control switches:
-
Factory Switch: Typically integrated into the dashboard or steering column, this switch is directly connected to the vehicle’s electrical system.
-
Aftermarket Switch: Designed to be installed independently of the factory wiring, these switches offer more flexibility in placement and functionality.
-
Remote Switch: Wireless or Bluetooth-operated, these switches provide the ultimate convenience and can be mounted anywhere in the vehicle.
Wiring Schematics
The wiring schematic for a fog light control circuit depends on the type of switch used:
-
Factory Switch: The wiring is integrated into the vehicle’s electrical system and may require additional relays or modules for proper operation.
-
Aftermarket Switch: Requires separate wiring harness that connects the switch to the fuse panel, battery, and fog light assembly.
-
Remote Switch: Involves a wireless receiver that is connected to the fog light wiring and a remote transmitter that communicates with the receiver to activate the fog lights.
Understanding the wiring schematics is crucial for proper installation and troubleshooting. By following these guidelines, you can ensure that your fog light control switch operates seamlessly, enhancing your driving experience in low-visibility conditions.
Installing Additional Fog Lights: Expanding Your Nighttime Visibility
Enhancing your vehicle’s visibility during inclement weather and nighttime conditions is crucial for ensuring safe driving. Fog lights play a vital role in illuminating the path ahead, reducing glare, and improving road visibility. If you’re looking to upgrade your vehicle’s lighting system, installing additional fog lights can significantly enhance your safety and driving experience.
Preparing for the Installation
Before embarking on the installation process, it’s essential to gather the necessary tools and materials. These typically include:
- Fog light kit
- Wiring harness
- Relay
- Electrical tape
- Hand tools
Consult your vehicle’s wiring diagram to identify the appropriate fuse panel and relay locations. This will help ensure that your fog lights are properly integrated into your vehicle’s electrical system.
Wiring Modifications and Relay Installation
Modifying your vehicle’s wiring is necessary to connect the additional fog lights to the electrical system. This typically involves:
- Tapping into the existing wiring harness to provide power and ground to the fog lights.
- Installing a relay to isolate the fog light circuit from the vehicle’s electrical system, protecting it from overloads.
The relay installation involves connecting its terminals to the battery, ground, fog light switch, and fog lights. Follow the wiring diagram carefully to ensure proper connections.
Tips for a Successful Installation
- Use proper electrical connectors to ensure secure and reliable connections.
- Solder all connections for added durability.
- Insulate all exposed wires with electrical tape or heat shrink tubing.
- Test the fog lights before completing the installation to verify their proper functionality.
Installing additional fog lights can provide increased visibility and safety during nighttime driving. By following these steps and taking appropriate precautions, you can enhance your vehicle’s lighting system and enjoy greater confidence on the road. Remember to consult your vehicle’s wiring diagram, use proper electrical techniques, and test the fog lights before completing the installation.
Upgrading to HID or LED Fog Lights: Enhancing Visibility and Style
Embracing the Latest Lighting Advancements
For discerning drivers seeking to elevate their fog light game, upgrading to HID (High-Intensity Discharge) or LED (Light-Emitting Diode) fog lights offers unparalleled advantages. These advanced lighting technologies not only enhance visibility in challenging conditions but also transform the aesthetic appeal of your vehicle.
HID Fog Lights: The Epitome of Brightness
HID fog lights produce an intense, white light that far surpasses the output of traditional halogen bulbs. They utilize a xenon-filled gas that ignites within a sealed glass capsule, generating an unmatched level of illumination. With their higher wattage, HID fog lights penetrate fog and darkness with ease, providing exceptional visibility for safer driving in adverse weather.
LED Fog Lights: Efficiency and Durability
LED fog lights, renowned for their energy efficiency and longevity, are a smart choice for environmentally conscious drivers. Their low power consumption significantly reduces the strain on your vehicle’s electrical system while delivering an impressive light output. LEDs emit a crisp, white light that is not only bright but also remarkably resistant to shock and vibration, ensuring reliable performance even on rough terrains.
Navigating the Conversion Process
Upgrading to HID or LED fog lights requires careful consideration of several key factors:
- Bulb Type: Determine the appropriate bulb type for your fog light housing and electrical system.
- Ballasts and Adapters: HID fog lights require ballasts to regulate the electrical current, while LED fog lights may require adapters to ensure compatibility with your vehicle’s wiring.
- Compatibility: Ensure that the chosen HID or LED fog light kit is compatible with the make and model of your vehicle.
By taking these factors into account, you can seamlessly integrate advanced lighting technology into your vehicle, transforming your driving experience with enhanced visibility and a touch of sophistication.