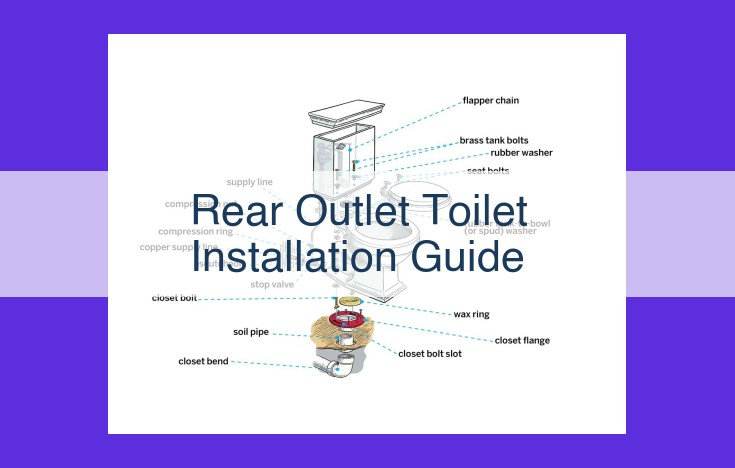
This comprehensive guide walks you through the essential steps for installing a rear outlet toilet. It covers crucial dimensions for rough-in, installing the toilet flange and base, and applying the wax ring for a watertight seal. You’ll learn how to position and bolt the toilet bowl securely, connect the water supply, and test for proper functionality. By following these detailed instructions, you can ensure a leak-free and successful toilet installation.
A Comprehensive Guide to Installing a Rear Outlet Toilet: A Journey Towards a Leak-Free Bathroom Oasis
In the realm of home improvement, where function meets aesthetics, rear outlet toilets have emerged as a game-changer. Unlike their traditional counterparts, these innovative fixtures boast a unique design that conceals unsightly pipes and creates a sleek, space-saving bathroom experience.
Imagine a bathroom where the toilet blends seamlessly into the wall, leaving you with ample space to move around and style as you please. Rear outlet toilets make this dream a reality, providing both aesthetics and functionality.
Unveiling the Essential Dimensions for Rough-In
Before embarking on your installation journey, it’s crucial to understand the dimensions that govern the rough-in, the initial preparation for installing the toilet. Measuring from the wall to the center of the drainpipe, the rough-in distance typically ranges from 12 to 15 inches.
Equally important is determining the location of the waste line. This is where the toilet connects to the main drainage system. By establishing these measurements, you’ll lay the foundation for a successful installation.
Essential Dimensions for Rear Outlet Toilet Rough-In: A Guide to Seamless Installation
Installing a rear outlet toilet requires careful planning and precise measurements during the rough-in stage. The rough-in distance and the location of the waste line are crucial factors that determine the successful placement of your toilet.
Rough-In Distance
The rough-in distance refers to the distance between the center of the toilet flange bolt holes and the finished wall behind the toilet. For most rear outlet toilets, the standard rough-in distance is 12 inches. However, it’s always best to consult the manufacturer’s specifications for the specific model you’re installing.
Location of the Waste Line
The waste line is the pipe that carries wastewater from the toilet to the main sewer line. The location of the waste line is important because it determines the position of the toilet flange. The flange must be installed directly above the waste line to ensure proper drainage.
Before roughing in a rear outlet toilet, it’s essential to verify the location of the waste line and mark the position of the toilet flange accordingly. Using a tape measure, carefully measure the distance from the finished wall to the center of the waste line pipe. This measurement will determine the rough-in distance for your toilet.
Precision is key during the rough-in process. Ensure that the measurements are accurate and that the toilet flange is installed directly above the waste line. This attention to detail will prevent any drainage issues or leaks in the future, ensuring a seamless and trouble-free toilet installation.
Installing the Toilet Flange: The Foundation for a Secure Fit
The toilet flange is the unsung hero of your bathroom, providing a secure connection between the toilet and the floor. Without a properly installed flange, you could be inviting a host of plumbing problems. Installing it correctly is crucial for a leak-free, hassle-free bathroom experience. Here’s a step-by-step guide to ensure a solid foundation for your rear outlet toilet.
Materials Needed:
- Toilet flange
- Expansion bolts or screws
- Level
- Pen or pencil
- Wrench or screwdriver
- Measuring tape
Step 1: Locate and Mark the Flange Position
Determine the exact rough-in distance, the measurement from the wall to the center of the waste line. Use a measuring tape and mark the spot on the floor with a pen or pencil.
Step 2: Install the Flange
Place the toilet flange over the marked location and align it. Ensure it sits level using a level. Mark the holes for expansion bolts or screws using a pen.
Step 3: Drill Pilot Holes (Optional)
For concrete floors, drilling pilot holes using a masonry drill bit may ease installation. However, it’s not necessary for most subfloors.
Step 4: Secure the Flange
Insert the expansion bolts or screws into the pilot holes (or directly into the subfloor if no holes are needed) and tighten them using a wrench or screwdriver. Tighten the bolts or screws securely, but avoid overtightening.
Step 5: Inspect
Once installed, double-check the flange for levelness and tightness. It should be firmly in place, providing a solid base for your toilet.
Tips:
- Use a wax ring between the flange and the toilet base to create a watertight seal.
- If the flange is damaged or worn, replace it with a new one to prevent leaks.
- For added stability, consider using a toilet base plate between the flange and the toilet base.
By following these steps, you can ensure a secure and leak-proof installation of your rear outlet toilet flange, setting the stage for a trouble-free bathroom experience.
Mounting the Toilet Base: The Foundation of a Leak-Free Installation
Installing the toilet base is a crucial step in the overall process of installing a rear outlet toilet, serving as the foundation upon which the toilet bowl will rest. The purpose of the toilet base is to provide a stable and secure connection between the toilet bowl and the flange, which is installed on the floor.
To install the toilet base, carefully align it with the flange and gently lower it down to rest on top. Secure the base to the flange using the provided bolts, ensuring they are tightened to the manufacturer’s specifications. This will create a solid connection that prevents the toilet from wobbling or moving when it’s in use.
Once the base is securely fastened, it will serve several important purposes. First, it distributes the weight of the toilet bowl evenly over the flange, reducing the risk of stress on any one point and preventing potential leaks. Second, it provides a flat and level surface for the toilet bowl, ensuring that it sits properly and does not rock or move when flushed.
Properly mounting the toilet base is essential for a leak-free installation. By following these simple steps and ensuring that the base is securely fastened to the flange, you can create a solid foundation for your toilet that will prevent leaks and ensure years of trouble-free use.
Applying the Wax Ring: Ensuring a Watertight Seal
In the realm of DIY plumbing, one of the most crucial steps in installing a rear outlet toilet is applying the wax ring. This unsung hero plays a vital role in creating a watertight seal between the toilet bowl and the flange, preventing any nasty leaks that could cause headaches down the road. So, let’s dive into the steps of proper wax ring placement:
-
Inspect the Flange: Before you start, make sure the flange is clean, level, and free of any debris or old wax. A clean surface will ensure a secure bond between the wax ring and the flange.
-
Choose the Right Wax Ring: Wax rings come in various sizes and thicknesses, so it’s important to select the one that matches the dimensions of your toilet base. A good rule of thumb is to choose a ring that’s slightly wider than the base to provide ample coverage.
-
Position the Wax Ring: Open up the wax ring package and carefully place it on the flange. Center it properly, aligning the horn (the raised portion) with the drain hole in the flange. Make sure the wax ring is firmly pressed down to create a good seal.
-
Secure the Wax Ring: Once the wax ring is in place, use a screwdriver or drill to tighten the flange bolts. This will compress the wax ring and ensure a tight fit. Avoid overtightening, as this could crack the flange or damage the wax ring.
-
Smoothing the Wax Ring: After tightening the bolts, use your fingers or a putty knife to smooth out any excess wax that may have squeezed out around the edges. This will help to create a more uniform seal and prevent leaks.
With the wax ring properly applied, you’re well on your way to a successful rear outlet toilet installation. Remember, a leak-free seal is key to a trouble-free bathroom experience. So, take your time and follow these steps carefully to ensure a watertight connection.
Positioning and Bolting the Toilet Bowl
Now that the wax ring is securely in place, it’s time to carefully maneuver the toilet bowl onto it. Align the bowl with the toilet base, making sure the bolts fit into their respective holes.
With the bowl correctly aligned, lower it gently onto the wax ring. Press down firmly to create a seal between the ring and the bottom of the bowl.
Next, secure the bowl by tightening the bolts. Use a wrench or a screwdriver to turn the bolts clockwise, but avoid overtightening. Tighten them just enough to keep the bowl securely in place.
Double-check the alignment to ensure the bowl is level and facing the correct direction. If necessary, make minor adjustments by loosening the bolts, shifting the bowl slightly, and retightening the bolts.
Once you’re satisfied with the positioning, fully tighten the bolts to ensure the toilet bowl is firmly secured. This will prevent any movement or shifting that could compromise the seal or cause leaks.
Connecting the Water Supply
Now that the toilet bowl is securely in place, it’s time to connect the water supply. This step is crucial to ensure a leak-free and functioning toilet.
Locate the water supply line that runs from the wall behind the toilet. It usually has a shut-off valve to control the water flow. Turn off the valve before proceeding.
Next, attach one end of the flexible supply hose to the shut-off valve. Tighten the connection securely using a wrench. Ensure that there are no leaks by turning on the valve briefly. If you notice any drips, tighten the connection further.
The other end of the supply hose connects to the fill valve located at the base of the toilet tank. Align the hose with the fill valve inlet and push it in firmly. You may need to use a pair of pliers to create a tight seal.
Once the hose is connected, turn on the shut-off valve and check for any leaks at the connections. If you find any, tighten the connections as needed.
Finally, flush the toilet to fill the tank and ensure the water supply is working properly. If the tank fills without any issues, congratulations! You have successfully connected the water supply to your rear outlet toilet.
Testing for Functionality: A Crucial Step for a Leak-Free Installation
Once the toilet is assembled and connected, the final step is to test its functionality and ensure it operates smoothly. This crucial step safeguards against leaks and guarantees a hassle-free installation.
Flushing and Visual Inspection
First, flush the toilet several times to verify that it fills and drains properly. Observe the performance of the flapper valve and ensure it closes tightly after each flush, preventing water waste. Additionally, check for any unusual noises or leaks around the base of the toilet, the connections to the water supply, and the drain line. A thorough visual inspection can quickly identify any potential issues.
Leak Detection
To confirm a leak-free installation, place a few sheets of tissue paper or a cloth around the base of the toilet, where it meets the floor. Leave them undisturbed for several minutes and then check for any signs of moisture. Dry tissue or cloth indicates a secure seal and no leaks. However, if there is any dampness, further investigation is required to locate and resolve the source of the leak.


