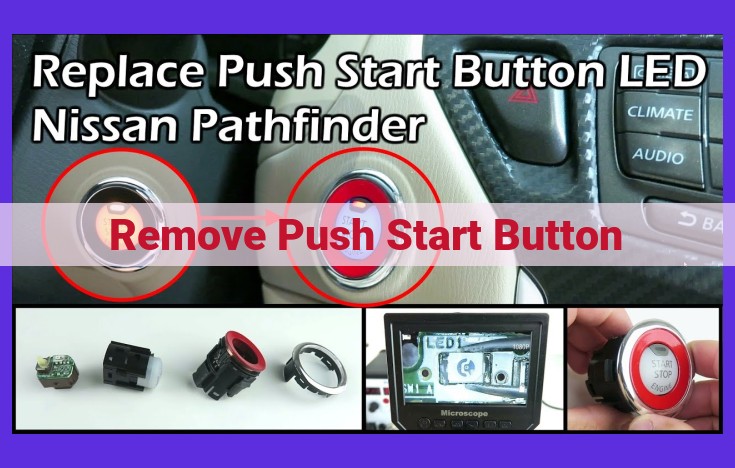
Removing a push start button involves identifying its location, carefully prying open trim panels with a trim removal tool, safely disconnecting the electrical connector, and removing the button by detaching any holding fasteners. It’s essential to follow safety precautions, including disconnecting the battery, and to consult the vehicle’s user manual for guidance. If encountering difficulties, seeking professional assistance is recommended.
Unveiling the Secrets of Push Start Button Removal
In the realm of modern vehicles, the reign of traditional key ignitions has dwindled, replaced by the sleek and effortless convenience of push start buttons. These buttons, adorned on dashboards, hold the power to ignite your vehicle with a mere press. But what happens when you need to remove them? Whether you’re facing an electrical malfunction or a customization project, understanding the intricate process of push start button removal is paramount.
To embark on this journey, let’s delve into the importance and purpose of a push start button. It serves as the gateway to your vehicle’s ignition system, allowing you to start the engine without the hassle of fumbling with keys. Its sophisticated design also adds a touch of elegance to the interior, complementing the sleek aesthetics of modern cars.
Push Start Button Basics: Understanding Its Role in Ignition
In today’s modern vehicles, the traditional key-operated ignition system has given way to the convenience of push-button start. This sophisticated technology offers a seamless and keyless starting experience, enhancing both comfort and security. However, understanding the fundamentals of a push start button is essential for any car enthusiast or DIYer.
The push start button is a vital component in the vehicle’s ignition system. Unlike traditional keys, which mechanically engage the ignition switch, the push-button start relies on an electronic circuit to initiate the engine’s combustion process.
Definition and Functionality
The push start button, also referred to as an ignition switch or starter button, is an illuminated, button-shaped device usually located on the dashboard or center console of the vehicle. When pressed, it activates a series of electrical commands that power up the vehicle’s electrical systems and trigger the engine’s starting sequence.
Role in the Ignition System
The push-start button plays a pivotal role in the vehicle’s ignition system, which comprises several essential components:
- Battery: The battery provides the electrical energy required to power the starting system.
- Ignition Coil: The ignition coil generates a high-voltage spark that ignites the air-fuel mixture within the engine cylinders.
- Starter Motor: The starter motor engages with the engine’s flywheel and cranks the engine, facilitating initial ignition.
- Push Start Button: The push start button sends a signal to the onboard computer, authorizing the ignition system to begin the engine starting process.
When the push start button is pressed, it initiates a series of intricate electrical sequences. The computer checks for authorization, verifies the driver’s key fob or other security measures, and then powers up the ignition system. The starter motor engages, turning the engine’s crankshaft and initiating the combustion process.
Removal Overview: A Step-by-Step Guide
Prepare yourself for the task at hand by familiarizing yourself with the steps involved in removing your push start button. This thorough guide will lead you through each stage, ensuring a smooth and successful process.
-
Start by identifying the trim panel that houses the push start button. This will vary depending on your vehicle’s make and model, so don’t hesitate to consult your user manual for guidance.
-
Once you’ve located the trim panel, carefully insert a trim removal tool into the edge and gently pry it open. Avoid using excessive force to prevent damage to the panel.
-
Locate the electrical connector attached to the push start button. Use a proper tool, such as needle-nose pliers, to release the connector. Be cautious not to pull on the wires as this could cause damage.
-
Identify the fasteners securing the push start button. This may include screws or clips. Use the appropriate tools to carefully remove the fasteners.
-
Gently lift the push start button out of its housing. Inspect the button and connectors for any damage. If you notice any issues, it’s best to seek professional assistance, as further tampering could compromise your vehicle’s electrical system.
Safety Precautions: A Primordial Step
Before embarking on the journey to remove your push start button, it’s imperative to prioritize safety. Remember, this is not a casual endeavor but a task that demands utmost caution. As such, we’ll enlighten you on essential safety measures that will safeguard you throughout the process.
Foremost, it’s crucial to disconnect the battery. This simple yet pivotal step will neutralize any electrical hazards, preventing accidental shocks or short circuits. Remember, working with electricity can be treacherous, so heed this advice diligently. By disconnecting the battery, you’re creating a safe working environment and minimizing potential risks.
Identifying the Push Start Button: The Key to Successful Removal
When it comes to removing a push start button, identifying its location is paramount to a successful operation. This critical step can be simplified by following these guidelines:
-
Locate the Button: Push start buttons are typically positioned in a central location on the dashboard, often surrounded by other controls. They usually feature a prominent symbol or label indicating their function.
-
Consult the User Manual: If you’re unsure of the button’s location or appearance, refer to your vehicle’s user manual. It provides detailed illustrations and instructions for identifying various components, including the push start button.
By carefully following these steps, you can pinpoint the push start button, ensuring a smooth and efficient removal process.
Using a Trim Removal Tool: A Gentle and Effective Approach
When embarking on the removal of a push start button, the judicious use of a trim removal tool is often an indispensable ally. This tool is meticulously crafted to safely pry open trim panels, minimizing the risk of damaging delicate components.
To wield this tool effectively, begin by safeguarding the vehicle’s interior. Cover delicate surfaces with clean cloths to prevent scratches. Next, locate the appropriate insertion point on the trim panel. It’s crucial to apply gentle pressure, gradually increasing force until the panel releases its grip.
Maintain a steady hand and avoid excessive force. Use slow and controlled movements, guiding the tool around curves and obstacles. This patience and precision will ensure the panel remains intact, without unsightly marks or tears.
Remember, the trim removal tool is a delicate instrument, designed to disengage trim panels without causing damage. Respect its purpose and handle it with care. By adhering to these guidelines, you’ll enhance the overall experience of removing the push start button, ensuring a seamless and successful endeavor.
Disconnecting the Electrical Connector
Unveiling the hidden world behind the push start button, we approach the delicate task of disconnecting the electrical connector. This intricate component serves as the lifeline between the button and the vehicle’s intricate electrical system.
Before embarking on this crucial step, it’s paramount to wield the appropriate tools. Electrical connectors come in various shapes and sizes, each requiring a specific approach. Consult your vehicle’s user manual or seek guidance from an experienced mechanic to determine the most suitable tool for the job.
With the correct tool in hand, gently locate the release mechanism on the connector. It’s typically a small tab or lever that, when pressed or lifted, separates the connector halves. Avoid exerting excessive force, as delicate pins and sockets can easily be damaged.
Once the connector is released, meticulously separate the halves, being mindful of any stray wires or loose connections. Insulate any exposed wires using electrical tape or heat shrink tubing to prevent short circuits. This meticulous attention to detail ensures the electrical system’s integrity remains intact throughout the removal process.
Removing the Push Start Button: A Step-by-Step Guide
Identifying the Fasteners
Once you’ve located the push start button, you’ll need to identify the fasteners that hold it in place. In most cases, these fasteners will be either screws or bolts. If you’re not sure what type of fasteners you’re dealing with, consult your vehicle’s user manual.
Cautious Removal
With the fasteners identified, you can begin removing the push start button. Be cautious when doing this, as you don’t want to damage any of the surrounding components.
If you’re removing screws, use a screwdriver that fits snugly into the screw head. If you’re removing bolts, use a wrench or socket that fits the bolt head.
Once the fasteners are removed, you should be able to gently pull the push start button out of its housing. If it doesn’t come free easily, don’t force it. There may be additional fasteners or clips holding it in place.
Congratulations! You’ve successfully removed the push start button. If you’re not comfortable performing this task yourself, it’s always a good idea to seek professional assistance.