Plan, prepare, and gather materials to ensure a seamless dashboard painting experience. Clean, sand, prime, and mask the surface for a smooth base. Choose durable paint and apply it evenly, considering color theory and design principles. Seal the paintwork to protect it from wear and tear. Remember safety precautions, troubleshoot any issues, and unleash your creativity to create a visually appealing and functional dashboard.
Plan Your Dashboard Painting Project: A Journey to Embellishment
Before embarking on your dashboard painting adventure, pause and meticulously plan. Begin by outlining a comprehensive project management strategy that will guide you through each step. Time management is crucial; allocate realistic deadlines to prevent rushing and ensure quality craftsmanship. Set clear goals for your painted dashboard, envisioning both the aesthetic and functional enhancements you seek.
Subtopic: Embracing Discipline and Organization for Success
Adhere to your project management schedule, honoring each deadline to maintain progress. Utilize a task list to track your accomplishments and identify areas requiring attention. Prioritize tasks based on importance and urgency, ensuring that critical steps are completed on time.
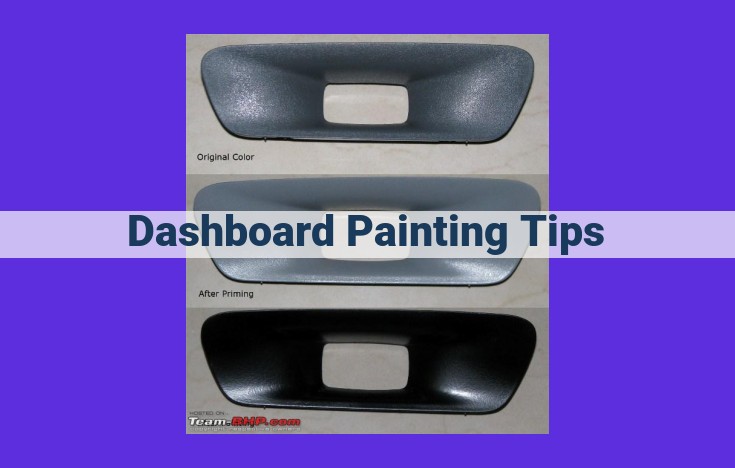
Prepare Your Dashboard Surface for a Flawless Finish
In the realm of car customization, every detail matters. A freshly painted dashboard can breathe new life into your vehicle’s interior, but before you start wielding the brush, thorough preparation is crucial for a smooth and paintable surface that will endure the test of time.
Cleaning: A Clean Canvas for Your Creative Vision
First and foremost, cleanliness is paramount. Dirt, dust, and oils can compromise the paint’s adhesion, leading to peeling or flaking down the road. Thoroughly scrub the dashboard with a mild detergent and warm water, paying special attention to any crevices or hard-to-reach areas. Let it dry completely before proceeding.
Sanding: Smoothing the Rough Edges
Once clean, sanding is essential to smooth out any imperfections. Use fine-grit sandpaper to gently abrade the surface, removing any rough spots or unevenness. This step is particularly important if you’re painting over an existing finish or repairing any chips or scratches.
Priming: Creating the Perfect Base
A primer acts as a bonding agent, promoting adhesion between the paint and the dashboard surface. Apply a thin coat of automotive primer evenly over the entire dashboard, ensuring it fully covers all sanded areas. Allow it to dry according to the manufacturer’s instructions.
Masking: Protecting the Unwanted
To prevent paint from creeping into unwanted areas, such as vents or controls, masking is crucial. Use masking tape or plastic sheeting to cover any parts you don’t want to paint. Be careful not to cover any areas that need to be painted, as this could lead to an uneven finish.
Gather Materials and Tools: The Essential Arsenal for a Stunning Dashboard Transformation
To create a flawless finish on your dashboard painting project, it’s crucial to assemble the right tools and materials. Here’s a comprehensive guide to help you navigate the world of dashboard painting supplies:
Brushes
Brushes are a versatile tool for precise application on delicate surfaces. Choose brushes with synthetic bristles for durability and resistance to paint absorption. Consider a variety of sizes and shapes to accommodate different areas of your dashboard.
Rollers
Rollers offer a smooth, even application for larger dashboard areas. Select a low-nap roller with a short, dense pile to prevent excess paint buildup. Foam or sponge rollers are ideal for intricate contours.
Sprayers
Sprayers provide a quick and efficient way to cover large surfaces with consistent paint coverage. Choose an HVLP sprayer (High Volume, Low Pressure) for its precision and reduced overspray. Alternatively, a conventional sprayer offers high-pressure application for thick or textured paints.
Paint Types
Selecting the right paint type is paramount for durability and aesthetics. For dashboard painting, consider the following options:
- Acrylic Enamel: Fast-drying and durable, acrylic enamel is suitable for interior and exterior applications. It offers a glossy finish that resists scratching and chipping.
- Urethane-Alkyd: A blend of urethane and alkyd resins, urethane-alkyd paint provides excellent resistance to chemicals, heat, and weathering. It dries to a semi-gloss finish.
- Epoxy: Formulated for heavy-duty applications, epoxy paint offers exceptional hardness and adhesion. It’s ideal for high-impact areas or surfaces prone to wear and tear.
Chapter 4: The Art of Paint Selection and Application
In the world of dashboard painting, color theory takes center stage. Colors have a profound impact on our emotions, perceptions, and the overall ambiance of a space. Understanding the color wheel and its principles can guide you towards selecting hues that complement your vehicle’s interior and evoke the desired mood.
But color isn’t the only factor to consider. Sheen refers to the surface finish of the paint, affecting the way light reflects off it. From the subtle elegance of flat sheens to the captivating brilliance of glossy surfaces, each finish creates a distinct aesthetic. Texture also plays a role. Metallic paints add depth and shimmer, while eggshell finishes create a soft, velvety touch.
Finally, durability is crucial. You’ll want a paint that can withstand the rigors of daily use, resisting scratches, fading, and chemical spills. Selecting a high-quality paint specifically designed for automotive interiors will ensure your dashboard maintains its vibrant appearance for years to come.
Applying the Masterpiece
Once you’ve meticulously chosen your paint, it’s time to bring your vision to life. Whether you opt for the precision of a sprayer, the smooth strokes of a brush, or the efficiency of a roller, proper application is key.
Start by ensuring the surface is clean, dry, and free of any debris. Apply a primer as a base coat to promote paint adhesion. When painting, be mindful of coat thickness and brushwork. Thin coats applied evenly will yield a more durable and professional-looking finish.
Allow ample time for drying between coats, especially if using multiple colors or effects. Remember, patience is a virtue in the world of painting. Don’t rush the process, as a well-executed paint job requires time and care.
Optimization for SEO on Page
- Title: Master the Art of Paint Selection and Application for a Stunning Dashboard Makeover
- Meta Description: Discover the secrets of color theory, sheen, texture, and durability to create a visually captivating and long-lasting dashboard design.
- Keywords: Dashboard painting, paint selection, color theory, sheen, texture, durability, application, tips
Design Your Dashboard: Harmony, Balance, and Focal Points
In the realm of dashboard artistry, design plays a pivotal role in transforming your automobile’s interior into a captivating masterpiece. To achieve a visually appealing and functional dashboard layout, it’s essential to embrace the principles of composition, balance, and focal point creation.
Composition refers to the arrangement of elements on your dashboard, much like painting a canvas. Just as an artist carefully places brushstrokes, you should thoughtfully position gauges, controls, and accessories. Consider the overall shape and form of the dashboard, ensuring it flows seamlessly with the vehicle’s design.
Balance is crucial for creating a sense of harmony. Visual weight, created by the size, shape, and color of elements, should be evenly distributed across the dashboard. Avoid creating areas that are visually heavy or cluttered. Experiment with asymmetrical or symmetrical arrangements to achieve aesthetic equilibrium.
Finally, focal point creation draws attention to the most important element on your dashboard, such as the speedometer, tachometer, or a navigation screen. Use contrast, color, or placement to highlight this feature, making it easy for drivers to locate and interact with.
By implementing these design principles, you can transform your dashboard into not just a functional workspace but also a visually stunning adornment that enhances the overall driving experience. Unleash your creativity and explore the endless possibilities of dashboard design, creating a space that reflects your unique style and personality.
Comprehending the Color Wheel for Stunning Dashboard Designs
Picture yourself in the enchanting world of colors, where hues dance and harmonize, creating vibrant canvases. The color wheel, a vital tool in the artist’s palette, serves as a guide to navigating this kaleidoscopic realm. It is a wheel-shaped diagram that displays the relationship between colors, making it an indispensable resource for dashboard painting enthusiasts.
Delving into the Color Wheel’s Anatomy
The color wheel comprises three primary colors red, blue, and yellow that cannot be created by mixing other colors. These primary colors form the foundation upon which all other colors are built. Arranged in a logical sequence, they are joined by secondary colors orange, green, and violet, which result from mixing two primary colors in equal proportions. Further mixing of primary and secondary colors produces tertiary colors, expanding the spectrum even wider.
Crafting Color Schemes with Confidence
Once you understand the color wheel’s anatomy, you can harness its power to create captivating color schemes for your dashboard. There are several approaches to combining colors, each with its unique visual impact:
-
Complementary Colors: These colors sit opposite each other on the color wheel, generating a striking and dynamic contrast. For example, red and green, blue and orange, or violet and yellow.
-
Analogous Colors: These colors are adjacent to each other on the color wheel, creating a harmonious and soothing effect. For instance, yellow-green, green, and blue-green.
-
Contrasting Colors: These colors are not directly opposite or adjacent to each other on the color wheel, creating a sense of visual tension and excitement. As an illustration, red and purple, blue and yellow, or green and orange.
Applying Color Schemes to Your Dashboard
With these color schemes at your fingertips, you can bring your dashboard painting vision to life. Experiment with different combinations to evoke specific moods and create a cohesive design. Complementary colors can add a bold statement, analogous colors create a calming ambiance, and contrasting colors inject a captivating energy.
Unleashing Your Creativity
Remember, the color wheel is not a rigid rulebook but rather a guiding tool that empowers you to explore boundless possibilities. Venture beyond these fundamental schemes and embrace your imagination. Draw inspiration from nature’s vibrant hues, art history’s masterpieces, or your personal experiences to create a dashboard design that truly reflects your style. The color wheel is your compass, guiding you through the colorful journey of dashboard painting.
Safeguard Your Dashboard: Types of Sealers, Varnishes, and Polyurethanes
Protecting your newly painted dashboard is crucial to maintain its pristine appearance and enhance its longevity. Several options are available to safeguard your dashboard from scratches, wear, and environmental elements.
Sealers
Sealers are transparent, liquid coatings applied to the painted surface. They create a protective layer that repels water, dirt, and UV rays. Acrylic sealers are ideal for indoor applications, while epoxy sealers provide superior protection in outdoor settings.
Varnishes
Varnishes are similar to sealers but contain resins that harden into a glossy or matte finish. They offer excellent UV resistance and protection from scratches and abrasions. Brush-on and spray-on varnishes are available, providing flexibility in application.
Polyurethanes
Polyurethanes are durable, two-part coatings that offer exceptional resistance to wear and tear. They form a strong, flexible film that protects against chemicals, solvents, and moisture. Polyurethanes are typically applied with a spray gun and require proper ventilation due to their strong odor.
Choosing the Right Protective Coating
The choice of protective coating depends on the usage and conditions the dashboard will experience. For indoor applications with moderate wear, sealers or varnishes suffice. For high-traffic areas or outdoor use, polyurethanes offer the best protection.
Application Tips
Proper application is key to ensure a long-lasting finish:
- Clean the dashboard thoroughly before applying any protective coating.
- Allow the paint to cure completely before sealing or varnishing.
- Apply thin, even coats and allow ample drying time between each layer.
- Use a high-quality brush or spray gun for professional-looking results.
By selecting the appropriate type of sealer, varnish, or polyurethane and following these application tips, you can safeguard your dashboard from scratches and wear, ensuring a beautiful and durable finish for years to come.
Troubleshoot and Repair Your Paint: Maintaining Your Dashboard’s Pristine Appearance
Maintaining the beauty and functionality of your painted dashboard requires proper care and maintenance. Inevitably, over time, you may encounter minor scratches, chips, or fading that disrupt the pristine appearance of your masterpiece. Fear not, for these imperfections can be easily remedied with some basic techniques and a touch of creativity.
Touching Up Minor Scratches
Minor scratches can be effortlessly concealed using touch-up paint, a godsend for dashboard enthusiasts. Carefully match the color to your existing paint and apply it sparingly with a fine-tipped brush. Allow ample drying time before lightly sanding the touched-up area with fine-grit sandpaper to blend it seamlessly with the surrounding paint.
Patching Larger Chips and Damage
Larger chips and damage require a bit more finesse and patience to repair effectively. Start by cleaning and sanding the damaged area thoroughly. Apply a thin layer of epoxy resin or filler to the chip and smooth it out using a putty knife. Gently sand the area once the filler has dried to create a smooth surface. Finally, touch up the patched area with paint and repeat the blending process described above.
Repainting the Entire Dashboard
If the paint on your dashboard has suffered extensive wear or damage, a complete repaint may be necessary to restore its original glory. Thoroughly clean and sand the entire surface, removing any old paint or imperfections. Choose a high-quality paint designed specifically for automotive dashboards and apply it in thin, even coats. Allow ample drying time between coats to ensure a durable and long-lasting finish.
Tips for Maintaining a Pristine Dashboard
- Use a microfiber cloth or soft brush for regular cleaning. Avoid abrasive sponges or harsh detergents that can damage the paint.
- Park in shaded areas whenever possible to minimize sun exposure and fading.
- Consider applying a UV-resistant sealant to protect your paint from the sun’s harmful rays.
- Avoid placing heavy objects or sharp items on the dashboard, which can cause scratches and dents.
- If you notice any scratches or damage, promptly repair them to prevent further deterioration.
By implementing these simple techniques, you can ensure that your painted dashboard remains a source of pride and joy for years to come. Remember, a well-maintained dashboard enhances both the aesthetics and functionality of your vehicle, making every drive a memorable and enjoyable experience.
Prioritizing Safety: A Paramount Precaution in Painting
As you embark on your dashboard painting adventure, it’s crucial to prioritize safety at every stage. This ensures a pleasant and risk-free painting experience, safeguarding your well-being and the quality of your work.
First and foremost, ensure adequate ventilation. Fumes from paint and solvents can pose respiratory hazards, especially in confined spaces like your car’s interior. Keep windows open, use fans, or wear a respirator to maintain a fresh and breathable environment.
Protective gear is also essential to shield you from paint particles and chemicals. Wear eye protection to prevent splashback, a dust mask to filter out airborne paint, and gloves to protect your skin. Moreover, avoid painting in areas with open flames or sparks, as paint fumes are highly flammable.
Fire Safety: A Non-Negotiable Aspect
Fire safety demands the utmost attention while painting. Paint fumes can ignite easily, posing significant risks. Never smoke or light open flames near the painting area. Additionally, keep a fire extinguisher close at hand for immediate access in case of an emergency.
- Store paint safely: Keep paint containers sealed to prevent spills and evaporation. Dispose of paint rags and waste materials properly to avoid spontaneous combustion.
- Use proper lighting: Avoid using incandescent bulbs or halogen lamps that emit heat, as they can ignite paint fumes. Opt for LED or fluorescent lighting instead.
- Respect electrical hazards: Ensure that all electrical circuits are turned off and grounded before painting. Avoid painting near electrical outlets or wires.
By adhering to these safety guidelines, you can create a safe and conducive environment for painting your dashboard, ensuring your personal well-being and the successful completion of your project.
Unlock Your Artistic Potential: Inspiring Dash Designs
Immerse Yourself in Art History’s Masterpieces
Let the iconic works of art ignite your imagination. Draw inspiration from the bold strokes of abstract expressionism to create a dynamic and attention-grabbing dashboard. Or, delve into the serene landscapes of Impressionism to evoke a calming and tranquil ambiance.
Harness Nature’s Tapestry of Colors and Textures
Connect with the beauty of the natural world. Incorporate the earthy tones of forests into your design, creating a sense of grounding and tranquility. Or, capture the vibrant hues of a sunrise, infusing your dashboard with a burst of energy and optimism.
Draw Inspiration from Your Personal Journey
Your unique experiences and emotions hold the key to a truly expressive dashboard design. Reflect on your travels, passions, and aspirations. Allow your dashboard to become a canvas that tells the story of your journey and inspires you daily.
Remember, your dashboard is not just a functional surface; it’s an extension of your personality. By embracing inspiration from art history, nature, and personal experiences, you can create a dashboard that is both visually stunning and deeply meaningful. Let your creativity soar and unleash the artist within to transform your dashboard into a work of art that reflects your unique identity.