This comprehensive guide provides step-by-step instructions for installing gas struts in automotive suspensions. It emphasizes safety precautions, explains component functions, and lists tools and materials. The installation process covers removing the old strut, installing the new one, and replacing the strut mount (if needed). Troubleshooting tips address potential issues like lack of support, noise, and leakage, ensuring proper function. By understanding the components and following the steps accurately, this guide enables successful and safe gas strut installation.
Gas Struts: Essential Components for Smooth and Safe Rides
In the intricate world of automotive suspensions and beyond, gas struts reign supreme as silent, yet powerful guardians of comfort and safety. They are the unsung heroes that absorb shocks, dampen vibrations, and ensure a smooth and stable driving experience. Their applications extend far beyond automobiles, into the realms of heavy machinery, industrial equipment, and even household appliances.
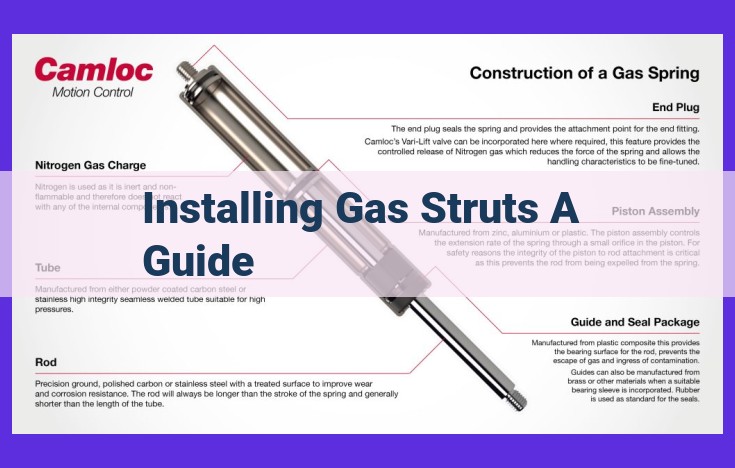
Gas struts, also known as gas springs, are marvels of engineering that combine the principles of gas pressure and hydraulics. Within their sleek, cylindrical bodies, a sealed chamber houses a piston rod surrounded by high-pressure nitrogen gas. As the piston rod moves, it compresses or releases the gas, creating a force that supports and controls movement.
Their versatility is remarkable. In automotive suspensions, they play a crucial role in absorbing road shocks, preventing excessive bouncing, and maintaining optimal ride height. In heavy machinery, they provide precise lifting and positioning of heavy loads, while in industrial equipment, they act as reliable dampeners, reducing vibrations and prolonging the lifespan of sensitive components. Even in our homes, gas struts find their place, assisting in the effortless opening of kitchen cabinets, lift gates, and reclining chairs.
Understanding the Intricate Components of Gas Struts
When it comes to automotive suspensions and other applications, gas struts play a pivotal role in ensuring smooth and controlled movement. Understanding the intricate components that make up these essential devices is crucial for proper installation and maintenance.
Gas Strut: The Core of the System
The gas strut, also known as a shock absorber, is the heart of the suspension system. Its cylindrical structure houses a pressurized gas chamber that generates force to counter the force of movement. The piston rod within the strut transmits this force, providing support and dampening vibrations.
Strut Mount: A Supporting Pillar
The strut mount, located at the top of the gas strut, serves as a cushion between the strut and the vehicle’s body. It absorbs shocks and vibrations, preventing damage to the strut and other components.
Ball Joint: Facilitating Movement
The ball joint, situated at the bottom of the gas strut, allows angular movement. It enables the suspension to pivot and adapt to changes in the road surface, ensuring optimal handling.
Socket Joint: Providing Rotational Flexibility
The socket joint, located at the point where the ball joint connects to the wheel, provides rotational movement. This allows the wheels to turn smoothly while maintaining stability.
Piston Rod: The Force Transmitter
The piston rod is the conduit through which force is transmitted from the gas chamber to the suspension system. It is a precision-engineered component that ensures smooth and controlled movement.
Damping: Controlling Movement
Damping is a crucial aspect of gas struts. It refers to the resistance provided by the strut to the movement of the suspension. This resistance helps to absorb and dissipate energy, preventing excessive bouncing or swaying.
Safety Precautions
- Emphasize the importance of protective gear, using proper tools, and discharging gas before removal.
- Stress the need for securely supporting the vehicle.
Safety Precautions: A Priority in Gas Strut Installation
When dealing with automotive gas struts, safety should always be at the forefront of your mind. These components store immense pressure, so taking the proper precautions is crucial to avoid injury. Before you begin working on a gas strut, don protective gear, including safety glasses and gloves.
Proper tools are also essential. Using the wrong tools could damage the strut or cause it to fail, putting you in danger. Make sure to have the right wrenches, sockets, and jacks for the job.
Before removing a gas strut, it’s imperative to discharge the gas. This can be done by using a special tool or by carefully pressing on the strut’s piston rod. Never attempt to remove a gas strut without discharging the gas first, as this could result in serious injury.
Finally, securely support the vehicle before working on the gas strut. This will prevent the vehicle from falling and causing damage or injury. Use jack stands or ramps to ensure that the vehicle is stable. By following these safety precautions, you can minimize the risks associated with gas strut installation and protect yourself from harm.
Tools and Materials for Gas Strut Installation
Replacing gas struts is a crucial task for maintaining your vehicle’s suspension and handling. While it’s always advisable to consult a professional mechanic, understanding the necessary tools and materials required for gas strut installation empowers you to take on this task confidently.
Safety First:
Before starting, prioritize safety by wearing protective gear, including gloves and safety glasses. It’s also essential to use the proper tools and equipment to avoid injury or damage to your vehicle.
Essential Tools:
- Wrench Set: A comprehensive set of wrenches is indispensable for removing and tightening nuts and bolts associated with gas struts.
- Socket Set: Similar to wrenches, sockets provide a secure grip on bolts and nuts for effective removal and installation.
- Impact Wrench (Optional): An impact wrench can speed up the process, but ensure you use it cautiously to avoid overtightening.
- Spring Compressor (Optional): If you encounter coil springs while removing the old struts, a spring compressor is vital for safety during compression.
Materials:
- New Gas Struts: Acquire high-quality gas struts specifically designed for your vehicle make and model.
- Replacement Strut Mounts: Worn-out strut mounts can compromise the performance of new gas struts. Consider replacing them simultaneously.
- Lubricant: A small amount of lubricant applied to the piston rod enhances smooth operation and prevents corrosion.
Additional Considerations:
- Vehicle Jack and Jack Stands: These tools are mandatory for securely supporting your vehicle while working on the suspension.
- Flashlight: A flashlight helps illuminate hard-to-reach areas during installation or inspection.
- Torque Wrench: For precise tightening of bolts and nuts to the manufacturer’s specifications, a torque wrench is recommended.
Remember:
Having the right tools and materials makes gas strut installation more efficient and less daunting. Safety remains paramount throughout the process. If you encounter any difficulties or uncertainties, don’t hesitate to seek professional assistance. By following these guidelines, you can ensure a successful gas strut installation and restore your vehicle’s suspension to optimal performance.
Step-by-Step Guide to Installing Gas Struts
Before we dive into the installation process, let’s take a moment to gather the necessary tools and materials. You’ll need a set of wrenches, sockets, a jack, and jack stands. You may also need a strut mount wrench if you’re replacing the strut mount.
Now we’re ready to begin!
Removing the Old Gas Strut:
- Safety first! Make sure your vehicle is parked on a level surface and the parking brake is engaged.
- Locate the gas strut. It’s typically attached to the suspension system near the wheel.
- Use a wrench to loosen the nuts that hold the gas strut in place.
- Slowly lower the jack to compress the gas strut. This will release the tension on the strut mount.
- Completely remove the nuts and carefully lift the gas strut out of its mounting points.
Installing the New Gas Strut:
- Insert the new gas strut into the mounting points.
- Tighten the nuts using a torque wrench to the manufacturer’s specifications.
- Raise the jack to extend the gas strut and check for any leaks.
- Double-check the tightness of all the nuts and bolts.
Installing the New Strut Mount (if required):
- Remove the old strut mount by unbolting it from the vehicle’s body.
- Install the new strut mount in its place and tighten the bolts.
- Insert the gas strut into the new strut mount.
Congratulations, you’ve successfully installed your new gas struts! Remember to check them regularly for wear and tear to ensure a safe and smooth ride.
Troubleshooting Gas Strut Issues
As you embark on your gas strut installation journey, it’s crucial to be aware of potential issues that may arise. Here’s a detailed guide to help you troubleshoot and resolve common problems:
Strut Not Supporting
If your newly installed gas strut fails to provide adequate support, there could be several underlying causes:
- Insufficient Gas Pressure: Check the gas pressure within the strut using a pressure gauge. If the pressure is too low, it may need to be recharged or replaced.
- Damaged Piston or Rod: Inspect the piston and rod for any signs of damage or wear. If they are compromised, the strut may not function properly.
- Obstructed Movement: Ensure that there are no obstacles hindering the movement of the strut. Check for any debris or misaligned components.
Noisy Operation
Persistent noises during strut operation can be an indication of worn or damaged components:
- Faulty Ball Joint or Socket Joint: Worn ball joints or socket joints can create creaking or clunking sounds. Replace the affected components to eliminate the noise.
- Damaged Damping: A malfunctioning damping system can lead to excessive rattling or squeaking. Check the damping mechanism and replace it if necessary.
- Loose Connections: Ensure that all bolts and connections are securely tightened. Loose components can generate rattling sounds during vehicle movement.
Leakage
Gas strut leakage is a serious issue that requires prompt attention:
- Damaged Strut or Mount: Inspect the strut and strut mount for any cracks or punctures. Leaking struts should be replaced immediately to prevent further damage.
- Defective Seal: A worn or damaged seal can allow gas to escape. Replace the seal to restore proper operation.