Craft a stunning Styrofoam wreath with this comprehensive guide! Learn the basics of wreath making, covering materials, tools, and techniques. Explore a variety of designs, from traditional to seasonal, and transform your home décor. Gain expert tips and tricks for streamlined crafting, cost savings, and troubleshooting, ensuring a successful and enjoyable experience.
Craft a Festive Masterpiece: The Ultimate Styrofoam Wreath Crafting Guide
Welcome to the realm of Styrofoam wreath crafting, a haven where creativity reigns and holiday cheer abounds. Whether you’re a seasoned crafter or a novice eager to dive into the world of DIY, this guide will take you on a magical journey of festive wreath creation. Prepare to transform ordinary Styrofoam into extraordinary masterpieces that will adorn your home and ignite the spirit of celebration.
Materials and Tools:
Gather an assortment of craft supplies that will become your magical toolbox: fabric, twine, yarn, and other materials to add texture and dimension to your wreath. For the DIY base, you’ll need wire, wood, foam, and more. Let your imagination run wild with embellishments like beads, sequins, and flowers to bring your wreath to life.
Essential tools include sharp scissors for precise cutting, a high-temperature glue gun for secure bonding, and X-Acto knives or craft knives for shaping and carving the Styrofoam base. With these tools in hand, you’ll be ready to embark on your Styrofoam wreath-crafting adventure.
Techniques and Design:
Discover the art of wreath making, mastering basic and advanced techniques for constructing the wreath’s base. Learn how to shape, attach, and secure the Styrofoam to create a solid foundation for your masterpiece. Embark on a ribbon adventure, exploring secure and decorative wrapping methods that will add a touch of elegance or whimsy to your wreath.
Dive into the world of embellishment application, where you’ll learn the secrets of strategically placing embellishments for a cohesive and visually appealing design. Unleash your creativity with a variety of wreath designs, from traditional to modern, rustic to seasonal. Explore the possibilities of using wreaths as wall art, table centerpieces, and door hangings to transform your home into a festive wonderland.
Tips and Troubleshooting:
Embrace time-saving techniques like pre-cutting supplies and using hot glue shortcuts to streamline your crafting process. Discover cost-effective solutions, repurposing everyday items and negotiating materials to create stunning wreaths without breaking the bank.
Navigate the occasional crafting mishap with confidence. Learn how to handle glue mishaps, untangle ribbon tangles, and prevent cuts and breakage of materials. With these troubleshooting tips, you’ll be well-equipped to overcome any crafting challenges that may arise.
Styrofoam Wreath Crafting Guide: A Comprehensive Guide for Beginners and Beyond
Embark on a Journey of Creativity with Styrofoam Wreaths
Welcome to the enchanting world of Styrofoam wreath crafting, a realm where your imagination takes flight. Whether you’re a seasoned DIYer or a crafting novice, this guide will equip you with the knowledge and inspiration to create breathtaking wreaths that will adorn your home with a touch of artistry.
Your Purposeful Guide to Styrofoam Wreath Crafting
This comprehensive guide is your trusted companion through the styrofoam wreath-making process. It is meticulously designed to guide you through every step, from gathering materials to troubleshooting common obstacles. Our aim is to empower you to unleash your creativity and craft stunning wreaths that will bring joy to your life and impress those around you.
Intended Audience: Embracing All Crafters
Our guide welcomes crafters of all levels, from beginners eager to explore this rewarding hobby to experienced enthusiasts seeking inspiration for their next masterpiece. Whether you’re looking to add a personal touch to your home décor or craft thoughtful gifts, this guide will provide you with the knowledge and confidence to create wreaths that will turn heads.
Essential Craft Supplies for Styrofoam Wreath Crafting
Embrace the Joy of Creation with Styrofoam Wreath Crafting
If you’re looking for a fun and fulfilling craft project that will add a touch of cozy charm to your home, styrofoam wreath crafting is an excellent choice. With just a few basic supplies, you can create stunning wreaths that reflect your personal style.
Meet Your Crafting Companions:
Fabric:
Fabric plays a pivotal role in styrofoam wreath crafting. Choose soft, flowing fabrics like chiffon, organza, or tulle to add a delicate touch. For a more rustic look, opt for burlap, canvas, or linen.
Twine and Yarn:
Twine and yarn are indispensable for securing elements and adding texture. Go for natural jute twine for a classic look or experiment with colorful cotton yarn for a playful touch.
Embellishments:
Let your imagination soar with an array of embellishments. Sequins, beads, and glitter lend a touch of sparkle, while artificial flowers, ribbons, and greenery bring the outdoors in. Don’t be afraid to mix and match materials to create unique and eye-catching designs.
Other Craft Essentials:
Complete your crafting kit with scissors, glue guns, wire, and floral foam. These tools will help you shape, secure, and embellish your wreath with ease.
Remember, the key to successful styrofoam wreath crafting lies in selecting high-quality supplies that will elevate your creations. So gather your materials, let your creativity flow, and prepare to transform your home into a cozy haven.
DIY Materials for Crafting a Styrofoam Wreath
When embarking on your Styrofoam wreath-crafting adventure, meticulous selection of materials is paramount. The foundation of your wreath begins with the right choice of base materials that will provide both structure and shape.
Wire: Sturdy yet pliable wire forms the skeletal framework of your wreath. Its flexibility allows you to mold and shape the base into a customizable silhouette. Choose wire with a diameter proportionate to the size of your desired wreath and wrap it around a mold or create freehand loops.
Wood: Wooden dowels, branches, or even plywood can serve as durable and natural bases for wreaths. The grain and texture of wood add a charming touch to your creations. You can cut, sand, and paint wood to match your design aesthetic.
Foam: Lightweight and versatile, foam can be shaped, carved, and decorated with ease. It’s perfect for creating custom embellishments, accents, and decorative elements that bring depth and dimension to your wreath. Look for foam in various densities to achieve different levels of firmness and support.
Other Materials: Cardboard, plastic mesh, or even recycled materials like old newspapers or fabric scraps can be repurposed as wreath bases. Experiment with unconventional materials to create one-of-a-kind designs that reflect your personal style.
Embellishments: Adorning Your Styrofoam Wreath with Creative Flair
Embellishments are the sparkling jewels that transform a simple Styrofoam wreath into a captivating work of art. These decorative accents add texture, color, and personality to your creation, making it a unique reflection of your style.
From shimmering beads to iridescent sequins and delicate flowers, the world of embellishments is your oyster. Consider the texture, size, and shape of each element to create a cohesive and visually appealing design.
-
Beads: Strung together or scattered randomly, beads add a touch of elegance and sparkle. Experiment with different sizes, shapes, and colors to create a captivating visual effect.
-
Sequins: These tiny, iridescent disks add a touch of shimmer and shine to your wreath. Use them sparingly to create subtle accents or go bold with a generous sprinkling for a dazzling display.
-
Flowers: Artificial or dried flowers bring a touch of nature’s beauty to your creation. Choose flowers that complement the season or the theme of your wreath for a harmonious look.
-
Ribbons: Not just for wrapping, ribbons can also be incorporated as embellishments. Twist, loop, or braid ribbons to create elegant bows, whimsical embellishments, or even the entire wreath’s design.
-
Greenery: Artificial greenery, such as leaves, ferns, or moss, adds a touch of natural charm to your wreath. Combine it with other embellishments for a realistic and inviting look.
-
Other Creative Accents: Let your imagination soar and explore other embellishments that suit your style. Buttons, feathers, pom-poms, or tiny figurines can add a playful or whimsical touch to your creation.
When selecting embellishments, consider the overall theme and color palette of your wreath. A traditional wreath might call for classic elements like red berries, pinecones, and greenery, while a modern wreath could incorporate metallic accents, geometric shapes, and abstract patterns.
Remember, the possibilities are endless. Embrace your creativity and let your embellishments tell a unique story on your Styrofoam wreath.
Scissors: The Indispensable Tool for Styrofoam Wreath Crafting
Embrace the Art of Crafting with Sharp and Durable Scissors
In the realm of Styrofoam wreath crafting, scissors reign supreme as the indispensable tools for precision cutting. Imagine yourself as a master surgeon, wielding a pair of sharp and durable scissors, ready to transform a humble piece of Styrofoam into a stunning masterpiece.
Why Sharpness Matters
Sharpness is paramount in wreath crafting, as it allows you to make clean, precise cuts without tearing or damaging the delicate Styrofoam base. Sharp scissors ensure that your cuts are clean and smooth, providing a solid foundation for your wreath’s structure.
Durability for the Long Haul
Durability is equally important, especially if you plan to craft multiple wreaths. Invest in a pair of durable scissors that can withstand the rigorous demands of cutting through Styrofoam, wire, and other materials.
Choose the Right Size for Your Purpose
The size of your scissors is another crucial consideration. For intricate cutting, smaller scissors offer greater precision. Larger scissors, on the other hand, are ideal for making wider cuts and shaping the wreath’s base.
Tips for Maintaining Sharpness
To keep your scissors sharp and in optimal condition, consider these tips:
- Avoid cutting through metal or other hard materials.
- Clean the blades gently with a damp cloth after each use.
- Store your scissors in a safe and dry place.
With sharp and durable scissors in hand, you are now equipped with the power to cut, shape, and create breathtaking Styrofoam wreaths that will adorn your home with elegance and style.
Glue Gun: The Essential Tool for a Strong and Secure Styrofoam Wreath
If you’re embarking on the exciting journey of Styrofoam wreath crafting, acquiring the right tools is crucial, and among them stands the indispensable glue gun. This versatile adhesive tool will be your crafting companion, ensuring the longevity and integrity of your wreath.
The Benefits of a High-Temperature Glue Gun
Unlike low-temperature glue guns, high-temperature models provide several advantages that make them the preferred choice for wreath crafting. Their higher operating temperature results in stronger adhesion, creating a firm bond between various materials. This is essential for securing embellishments, such as ribbons, beads, and flowers, which will endure the rigors of handling and display.
Moreover, the fast-drying capability of high-temperature glue guns streamlines your crafting process. As the glue dries rapidly, you can move on to the next step without waiting for the bond to set, saving you precious time.
Choosing the Right Glue Sticks
The performance of your glue gun is also influenced by the glue sticks you use. Opt for high-quality glue sticks specifically designed for Styrofoam, as they provide optimal adhesion and prevent damage to the delicate foam material. Clear glue sticks are ideal for maintaining a seamless appearance, while colored glue sticks can add a touch of creativity.
Tips for Using a Glue Gun
- Use a stable surface: Place your wreath on a flat and secure surface before applying glue to avoid spills.
- Apply glue sparingly: A thin layer of glue is sufficient to create a strong bond. Overapplying glue can lead to messy residue and weakening the adhesion.
- Hold the glue gun steadily: Hold the glue gun perpendicular to the surface and apply pressure evenly for a uniform bond.
- Remove excess glue: Use a pair of tweezers or a toothpick to remove any excess glue that may squeeze out.
- Allow glue to cool: Before handling the glued items, allow the glue to cool and set completely to ensure a secure bond.
**Mastering the Art of Foam Wreath Crafting: The Role of Cutting Tools**
When embarking on your Styrofoam wreath crafting adventure, the right tools can make all the difference. Among them, cutting tools reign supreme, shaping and carving the very foundations of your wreath’s design.
X-Acto Knives: Precision at Your Fingertips
X-Acto knives are the surgeon’s scalpel of the crafting world. Their sharp, ultra-fine blades allow for intricate carving and shaping, transforming ordinary Styrofoam into extraordinary creations. From delicate leaf veins to intricate swirls, these knives empower you to bring your artistic vision to life with meticulous precision.
Craft Knives: Versatility and Power
Craft knives, with their sturdy blades, excel in larger-scale tasks. They can swiftly slice through thicker foam sheets, creating the framework of your wreath. Their versatility extends to shaping foam embellishments, such as flowers or berries, giving them a realistic, lifelike touch.
Safety First: Essential Precautions
While cutting tools provide immense creative potential, safety should never be compromised. Always handle them with care, using safety gloves to protect your hands and a cutting mat to prevent damage to surfaces. Sharp blades require sharp minds; never use a dull knife, as it may slip and cause injury.
Tips for Cutting Success
- Use light pressure: A delicate touch is key to precise cutting. Too much force can crush the foam or create unwanted lines.
- Follow the grain: Styrofoam has a natural grain. Cutting with the grain reduces tearing and gives your wreath a polished finish.
- Score first, cut later: For intricate designs, lightly score the foam before cutting. This creates a guide, ensuring clean, straight cuts.
- Protect your work: While cutting, hold the foam down firmly to prevent it from shifting and distorting your design.
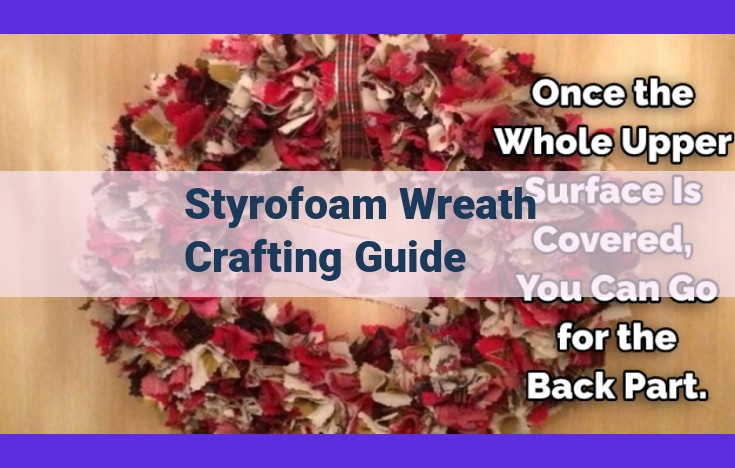
Wreath Making: Mastering the Art of Crafting Styrofoam Masterpieces
Laying the Foundation: The Styrofoam Base
The heart of your Styrofoam wreath lies in its sturdy base. Begin by carefully shaping the Styrofoam into your desired form. Use sharp cutting tools to carve the Styrofoam and create intricate designs.
Next, attach the Styrofoam to a wire or wooden frame. Secure it with wire or hot glue, ensuring a firm hold. This frame will provide structural support for your wreath and prevent it from wobbling or deforming.
Ribbon Magic: Transforming the Base with Fabric
Transform your Styrofoam base into a piece of art by wrapping it with ribbon. Choose ribbons in vibrant colors and textures to match your design theme. To secure the ribbon, knot it tightly around the base and wrap it in an overlapping pattern.
For a more intricate touch, consider double wrapping the ribbon. Wrap one ribbon horizontally and another vertically, creating a rich and visually appealing effect.
Advancing Techniques: Sculpting with Hot Glue
Take your wreath-making skills to the next level by using hot glue to sculpt and decorate. Apply glue to specific areas of the Styrofoam and immediately attach embellishments such as beads, sequins, or fabric. You can create raised designs, 3D elements, or intricate patterns.
Experiment with different glue application techniques to achieve varying effects. Use thin lines for delicate details or thicker lines for bold accents. Practice on scrap Styrofoam to master your technique before applying it to your masterpiece.
Ribbon Attachment: Enhancing Your Styrofoam Wreath with Grace and Finesse
When it comes to embellishing your Styrofoam wreath, ribbons play a crucial role in adding a touch of elegance and sophistication. Their versatility allows you to experiment with various wrapping techniques, creating both secure and visually appealing designs that will elevate your creation.
Secure Knots for a Lasting Bond
Begin by tying a sturdy knot at one end of your ribbon. This will serve as the base of your attachment and prevent the ribbon from slipping off. For extra security, double-knot the ribbon or consider using a dab of hot glue to reinforce the hold.
Elegant Wrapping Techniques
With your ribbon securely attached, it’s time to unleash your creativity. Wrap the ribbon around the wreath, gently pulling it taut to ensure it stays in place. Experiment with different wrapping styles, such as criss-crossing or spiraling, to achieve a unique and eye-catching effect.
Intricate Knots for a Decorative Touch
Once you’ve covered the wreath’s surface with ribbon, you can add an extra touch of flair with decorative knots. Try tying a bow at the top or bottom of the wreath, or experiment with more intricate knots such as the French or square knot. These embellishments will add depth and visual interest to your design.
Coordinating Ribbons for Harmony
To create a cohesive and harmonious look, consider using ribbons in coordinating colors or patterns. This will help tie the overall design together and create a visually pleasing effect. Experiment with different combinations to find the perfect balance that complements your wreath’s theme and décor.
Personalize with Ribbons
Ribbons offer a wonderful opportunity to personalize your Styrofoam wreath. You can incorporate ribbons that reflect your favorite colors, patterns, or even add ribbons with meaningful words or phrases. By infusing your personal style into the design, you’ll create a wreath that truly resonates with you.
Embellishment Application: A Guide to Enhancing Your Styrofoam Wreath’s Visual Appeal
As you delve into the enchanting world of Styrofoam wreath crafting, the application of embellishments marks a pivotal step in transforming your creation from a mere object into a captivating centerpiece. With this guide, we’ll embark on a journey of strategic placement and visual harmony, ensuring that your wreath exudes a cohesive and eye-catching design.
To begin, let’s gather our tools—a pair of tweezers or a fine-tipped paintbrush will prove invaluable allies in our quest for precision. With steady hands and a keen eye, we’ll carefully arrange each embellishment, considering its size, shape, and interplay with the surrounding elements. A touch of glue or hot glue will secure them firmly in place, allowing your creativity to blossom.
The Art of Balance:
Achieving a harmonious balance of embellishments is akin to dancing on a tightrope. Too many and your wreath risks becoming cluttered and overwhelming; too few and it may appear sparse and uninspired. Strive for a balance that captures the eye without overwhelming it. Consider the wreath’s overall shape and size, distributing embellishments evenly to create a cohesive whole.
Color Harmony:
Color plays a vital role in creating a visually appealing wreath. Choose embellishments that complement each other and the base of your creation. Contrast can be used to create focal points, while analogous colors offer a sense of unity. Experiment with different hues and tones, blending them seamlessly for a cohesive and captivating effect.
Texture and Dimension:
Embellishments offer a wonderful opportunity to add texture and depth to your wreath. Incorporate a mix of materials, such as fabric, sequins, and beads, to create a tactile experience. By varying the sizes and shapes of your embellishments, you can add a touch of whimsy and visual intrigue. Remember, the interplay of textures and dimensions adds dimension and visual interest to your masterpiece.
Storytelling Through Embellishments:
Each embellishment you choose tells a story, conveying a message or sentiment. A cluster of shells might evoke memories of beach days, while a scattering of miniature stars could represent a constellation of hope. Consider the theme of your wreath and select embellishments that enhance its narrative, creating a truly unique and meaningful keepsake.
By following these guidelines, you’ll elevate your Styrofoam wreath from a simple craft to a captivating work of art. Embrace the power of embellishments, and let your imagination soar as you create a wreath that reflects your personal style and tells a story that will be treasured for years to come.
Wreath Designs: A World of Creative Expression
The Timeless Charm of Tradition
Traditional wreaths exude a timeless elegance that transcends time. Picture the iconic evergreen wreath adorned with vibrant red ribbons and shimmering gold bells. Its circular shape, representing eternity, adds a touch of warmth and cheer to any space.
A Modern Twist on the Classics
For those seeking a contemporary edge, modern wreaths offer a refreshing take. Geometric shapes, bold colors, and unconventional materials break away from convention. Think wire mesh wreaths painted in vibrant hues, or wreaths made from recycled fabrics and found objects.
Rustic Charm for Nature Lovers
Rustic wreaths embrace the beauty of nature’s imperfections. Wood, burlap, and twigs come together to create a cozy, down-to-earth aesthetic. Adorn these wreaths with dried flowers, antlers, or antique lace to evoke a sense of nostalgia.
Seasonal Splendor: Wreaths for Every Season
Let the changing seasons inspire your wreath designs. During summer, wreaths burst with color and life, adorned with fresh flowers, seashells, and fruit. Autumn wreaths capture the vibrant hues of falling leaves, with pumpkins, acorns, and pinecones adding a touch of autumnal warmth. Winter wreaths sparkle with the magic of snow, boasting frosted pinecones, twinkling lights, and berry-laden branches. Spring wreaths herald the arrival of new life with pastel colors, blooming flowers, and delicate butterfly adornments.
A Symphony of Styles for Every Occasion
Whether you’re crafting a wreath for your front door, a festive family gathering, or an intimate home décor touch, there’s a wreath design to suit every taste and occasion. Embrace the joy of crafting and let your creativity shine through!
Seasonal Decorations: A Wreath for Every Occasion
Embarking on a wreath-crafting adventure is a delightful pursuit, especially when you infuse each creation with the spirit of the season. Let’s dive into a world of seasonal wreaths that will transform your home into a festive haven.
Spring’s Embrace:
As nature awakens from its slumber, create a wreath adorned with soft pastels and cheerful blossoms. Delicate ribbons in shades of pink, blue, and yellow dance around the base, while faux flowers evoke the fragrance of a blooming meadow. Tiny butterflies flit around the wreath, symbols of hope and renewal.
Summer’s Sizzle:
Celebrate the warmth of summer with a wreath ablaze with vibrant colors. Bold fabrics in hues of orange, red, and yellow evoke the sun’s fiery kiss. Seashells whisper tales of ocean breezes, while starfish add a touch of coastal charm. Twinkling fairy lights cast a magical glow, creating a whimsical ambiance.
Autumn’s Embrace:
As the leaves turn into a fiery tapestry, create a wreath that captures the essence of fall. Rich autumn colors of burnt orange, crimson, and mustard adorn the base. Pine cones and acorns bring the outdoors in, while cinnamon sticks fill the air with an intoxicating scent. Dried leaves dance and rustle in the autumn wind, lending a touch of nostalgia.
Winter’s Magic:
When the snow falls softly, transform your home with a festive wreath that embodies the magic of winter. Sparkling white ribbons mimic the purity of freshly fallen snow, while evergreen boughs bring the scent of the forest into your living space. Red berries and holly leaves add a touch of Christmas cheer, while ** twinkling lights** evoke a sense of warmth and wonder.
Conclusion:
With a little imagination and creativity, you can craft seasonal wreaths that evoke the spirit of every occasion. From spring’s pastels to winter’s magic, each wreath tells a story and adds a touch of enchantment to your home. Embrace the seasons, let your creativity flow, and create wreaths that will light up your life and bring joy to those around you.
Wreaths: Versatile Decor Elements for Every Season and Space
Adorn your home with the charm and elegance of Styrofoam wreaths, versatile decorative masterpieces that can transform any space. Whether you prefer traditional, modern, or rustic designs, wreaths offer endless possibilities for personalization and seasonal flair.
From festive Christmas wreaths adorned with twinkling lights and shimmering ornaments to springtime creations adorned with vibrant flowers and delicate greenery, wreaths have the power to evoke the essence of each season. Hang them on your front door to welcome guests with a warm embrace or display them as wall art to add a touch of style and personality to any room.
The versatility of wreaths extends beyond their aesthetic appeal. They serve as practical table centerpieces, adding a touch of elegance to your gatherings. Drape them over a mantelpiece or bookshelf to create a cozy and inviting atmosphere. The possibilities are truly boundless.
Embrace the joy of crafting by creating your own unique Styrofoam wreaths. Experiment with different designs and embellishments to match your personal style. Whether you prefer the classic charm of ribbon-wrapped wreaths or the rustic beauty of twig-adorned creations, the only limit is your imagination.
By following the tips and techniques outlined in this guide, you’ll be able to craft stunning wreaths that will enhance the beauty of your home for years to come. So gather your materials, let your creativity flow, and embark on the delightful journey of Styrofoam wreath crafting.
Time-Saving Techniques: Pre-Cutting and Hot Glue Shortcuts
Crafting with Styrofoam wreaths can be an enjoyable and rewarding experience, but it can also be time-consuming. However, by implementing a few clever time-saving techniques, you can significantly streamline the process and create beautiful wreaths in a fraction of the time.
One of the most effective ways to save time when making Styrofoam wreaths is to pre-cut your supplies. This may seem obvious, but it’s a step that many crafters often overlook. By taking the time to pre-cut your ribbon, fabric, and other materials before you start crafting, you can eliminate a lot of the cutting and measuring that can slow you down.
Another great way to save time when crafting with Styrofoam wreaths is to use hot glue shortcuts. Hot glue is a powerful and versatile adhesive that can be used to attach a wide variety of materials quickly and easily. However, it can also be messy and time-consuming to use if you’re not careful.
By using hot glue shortcuts, you can significantly reduce the amount of time you spend waiting for glue to dry. For example, you can use a hot glue gun to quickly and easily attach ribbon to the Styrofoam base of your wreath. You can also use hot glue to attach embellishments, such as beads, sequins, and flowers, to your wreath.
By implementing a few simple time-saving techniques, you can significantly streamline the process of making Styrofoam wreaths. With a little planning and preparation, you can create beautiful wreaths in a fraction of the time.
Here are some additional tips for saving time when crafting with Styrofoam wreaths:
- Use a sharp knife to cut your Styrofoam base. This will help you to create clean, precise cuts that will look great when wrapped with ribbon or fabric.
- Use a hot glue gun with a fine tip. This will help you to apply glue precisely and avoid making a mess.
- Be patient when applying glue. Allow the glue to dry completely before moving on to the next step. This will help to prevent your wreath from falling apart.
- Don’t be afraid to experiment with different techniques. There are many different ways to make a Styrofoam wreath, so find one that works for you and have fun!
Cost-Effective Solutions: Offer tips on repurposing everyday items, negotiating materials, and finding cost-saving alternatives.
Cost-Effective Styrofoam Wreath Crafting
Cost-Effective Solutions
Crafting doesn’t have to break the bank. Here are some money-saving tips to help you create beautiful Styrofoam wreaths without sacrificing quality:
- Repurpose everyday items: Look around your home for items that can be repurposed into wreath embellishments. For instance, use old buttons, beads from broken jewelry, or fabric scraps from previous projects.
- Negotiate materials: If you’re buying materials from a craft store, don’t be afraid to negotiate. Ask for discounts or consider bulk purchases to save money.
- Look for cost-saving alternatives: Many craft materials can be substituted with cheaper alternatives. For example, use twine instead of ribbon, or foam beads instead of glass beads. By being resourceful and using what you have on hand, you can create stunning wreaths without spending a fortune.
Crafting a Styrofoam wreath doesn’t have to be expensive. With a little creativity and money-saving strategies, you can create a beautiful and unique wreath that will enhance your home decor without breaking the bank.
Common Glue Mishaps and How to Prevent Them
Styrofoam wreath crafting is a fun and rewarding experience, but it can also be frustrating if you encounter glue mishaps. Don’t let glue ruin your wreath-making journey! Here are some common glue mishaps and how to handle them:
Glue Overflow and Stringing
Problem: Glue gets stringy and forms ugly threads when applied or pulled apart.
Solution:
* Use a high-quality glue gun with a fine tip for precise application.
* Pull the glue gun away quickly and smoothly to avoid stringing.
* Clean the glue gun tip regularly to prevent buildup.
Glue Blobs and Excess
Problem: Too much glue accumulates in certain areas, creating unsightly blobs.
Solution:
* Apply glue sparingly and evenly.
* Use a toothpick or craft stick to spread the glue and remove excess.
* Wipe away any glue that seeps out with a damp cloth.
Dried Glue Stains
Problem: Glue hardens and leaves visible stains on materials.
Solution:
* Remove fresh glue stains immediately with a damp cloth.
* For dried glue stains, use a commercial glue remover, such as Goo Gone or acetone. Caution: Test on an inconspicuous area first to ensure no damage occurs.
* If the stain is on Styrofoam, gently scrape it off with a sharp object, avoiding scratching the surface.
Preventing Glue Mishaps
- Practice: The key to avoiding glue mishaps is practice. The more you work with glue, the better you will become at controlling its application.
- Test: Always do a small test spot before applying glue to the entire wreath. This will ensure compatibility and reduce the risk of damage.
- Cleanliness: Keep glue surfaces clean by regularly wiping away excess glue. A clean work area will minimize the chances of glue contamination.
- Patience: Take your time when applying glue. Rushing can lead to mistakes. Allow ample time for glue to dry before moving pieces around.
Ribbon Tangles: Untangling the Knotty Nightmare
If you’ve ever experienced the frustration of dealing with tangled ribbons, you know it can quickly turn a creative craft into a nightmare. But fear not, fellow crafters! In this guide, we’ll delve into the world of ribbon detangling, providing you with practical tips and techniques to keep your ribbons neat and organized.
Prevention is Key: Avoiding Tangles
Before you find yourself caught in a tangled web, let’s focus on prevention. Here are a few simple steps you can take to minimize the likelihood of ribbon tangles:
- Store Ribbons Properly: Keep your ribbons organized in designated containers, such as boxes, bags, or drawers. Avoid stuffing them haphazardly into a drawer or closet, as this can lead to chaos.
- Spool Ribbons Before Storage: Instead of leaving your ribbons in loose piles, wind them around empty spools or cardboard tubes. This keeps them neatly coiled and prevents tangles.
- Use Ribbon Separators: When storing multiple ribbons together, use ribbon separators or threaders to keep them divided. These handy tools prevent ribbons from intertwining and creating a tangled mess.
Brave the Tangle: Untangling Techniques
Even with the best preventive measures, tangles can sometimes happen. Here’s how to untangle ribbons efficiently and without causing damage:
- Start from the Outside: Begin untangling from the outer edge of the knot. Slowly and carefully pull apart the ribbons, working inward towards the center.
- Wet the Knot (Optional): If the tangle is particularly stubborn, you can try wetting the knot slightly with water. This can help loosen the fibers and make them easier to separate.
- Use a Pin or Needle: For tiny knots, a pin or needle can be helpful for gently separating the fibers. Insert the pin into the knot and carefully pull apart the strands.
- Cut the Knot (Last Resort): In extreme cases, you may need to cut the knot. Use sharp scissors and cut as close to the knot as possible without damaging the ribbon.
Storage Tips for Easy Untangling
Once you’ve untangled your ribbons, it’s time to store them properly to prevent future tangles. Here are some additional tips:
- Hang Ribbons: For long or heavy ribbons, consider hanging them on a ribbon rack or pegboard. This keeps them vertical and prevents them from tangling or creasing.
- Use Ribbon Winders: Automatic ribbon winders can quickly and efficiently wind ribbons onto spools, keeping them neat and ready to use.
- Label Your Ribbons: If you have a large collection of ribbons, label them with their size and type. This makes it easier to find the ribbon you need without having to untangle a jumbled mess.
By implementing these simple techniques and storage strategies, you can keep your ribbons tangle-free and your crafting projects flowing smoothly. Remember, a little patience and the right tools can make all the difference in untangling the ribbony chaos and unleashing your creativity.
Mastering Styrofoam Wreath Crafting: Prevent Cuts, Breakage, and Warping
As you embark on your Styrofoam wreath crafting journey, it’s crucial to safeguard your materials from potential damage. Here’s a comprehensive guide to help you prevent cuts, breakage, and warping throughout the process:
Protecting Your Hands
When cutting Styrofoam, sharp X-Acto knives or craft knives are essential. Always handle them with care, and avoid rushing through the process. Wear appropriate hand protection, such as gloves, to minimize the risk of cuts.
Preserving the Styrofoam Base
Treat the Styrofoam base with utmost care to prevent breakage or warping. Avoid excessive force when shaping or attaching it. Use smooth cutting strokes and gently bend the Styrofoam to desired angles.
Safeguarding Embellishments
When attaching embellishments, handle delicate items such as beads and sequins with patience. Use a low-temperature glue gun to avoid damaging them. For heavier embellishments, consider using wire or twine for stability.
Preventing Ribbon Mishaps
To avoid ribbon tangles, meticulously unwind the ribbon from the spool before starting. When storing ribbons, roll them neatly to prevent wrinkles. For complex ribbon designs, sketch your plan on paper first to minimize mistakes.
Minimizing Dust and Debris
Styrofoam crafts can generate dust and debris. To protect your materials and workspace, work in a well-ventilated area. Use a dust mask to avoid inhaling particles. Regularly clean your work surface and tools to reduce accumulation.
By following these precautions, you can confidently navigate the crafting process while preserving the integrity of your materials. Happy wreath-making!


